Sweet Conchas!

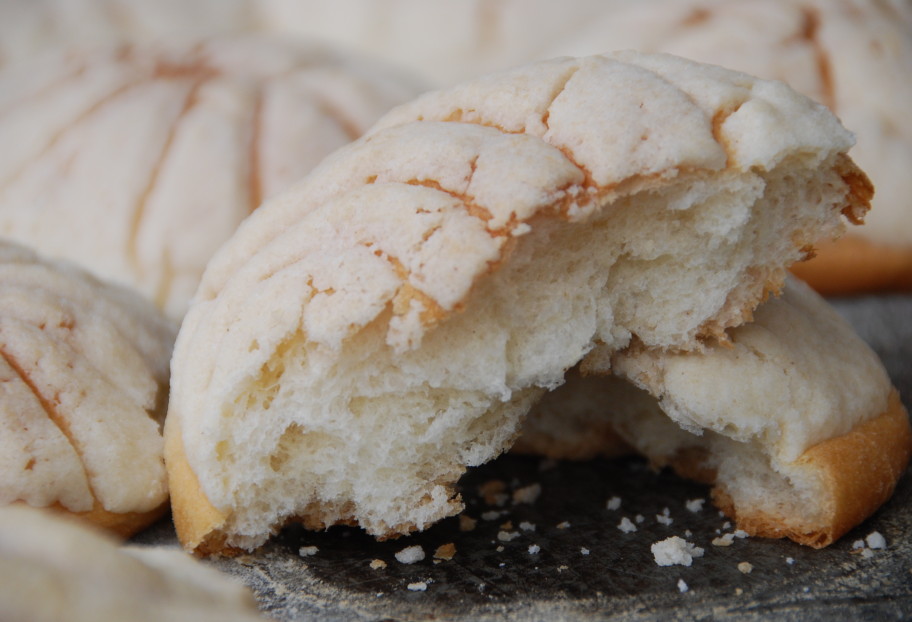
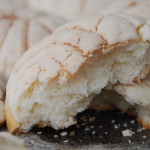
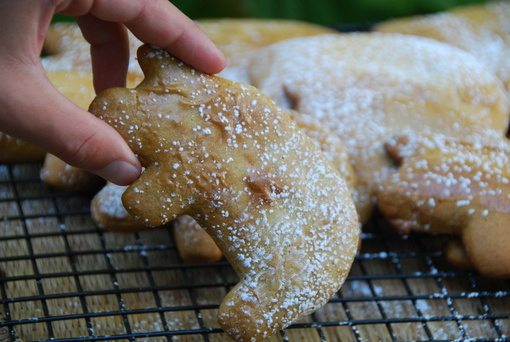
I can finish a normal sized Concha, 4 to 5″ round, in exactly four bites. If it has been a long time since I had one or if I am very hungry, maybe three bites. Ok, I admit it, sometimes two bites. But never one.

Conchas are named after the shape of their sugar topping, which resembles a seashell. Conchas do have a hardened crust, but it is sugary, thick, crispy and crumbles right into your mouth as you take a bite. Right after you brake through that crust, there is a fluffy, soft, sweet roll made with flour, butter, yeast and eggs.  With such a pleasing experience, no wonder it is one of Mexico’s most favorite sweet rolls or pan dulce.

I have seen some in bakery shops around DC, but they just don’t taste like the ones we love at home. So on our most recent trip to Valle de Bravo in Mexico, I ventured with my boys, and many of their cousins and aunts, into a panaderí­a, or bread shop. They make such incredible conchas, it makes me wish I had a bigger mouth  to eat them each in a single bite.
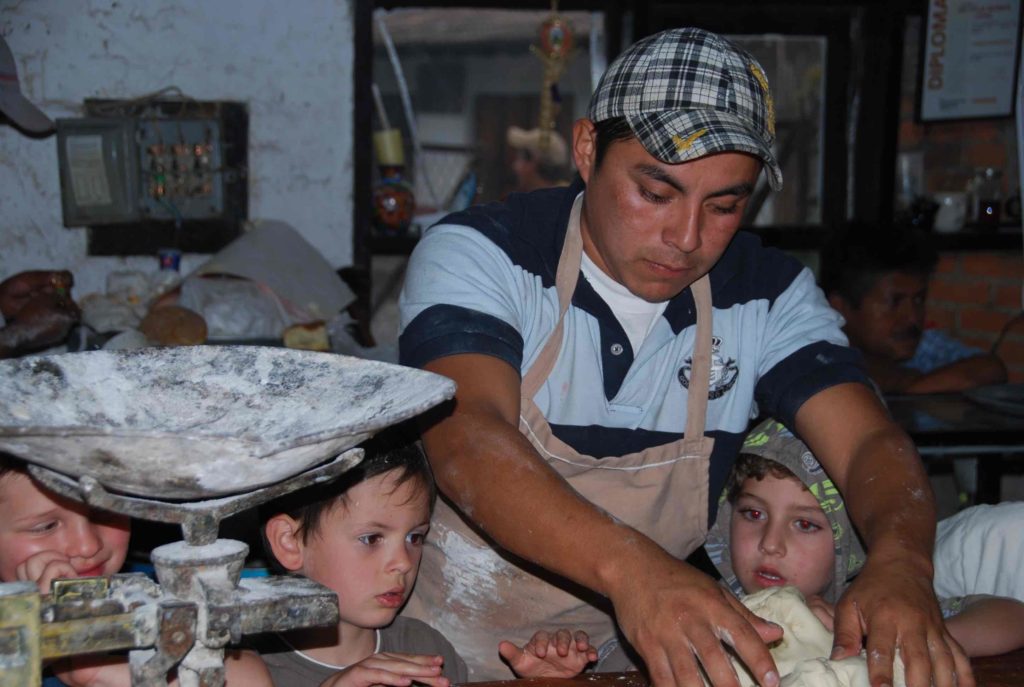
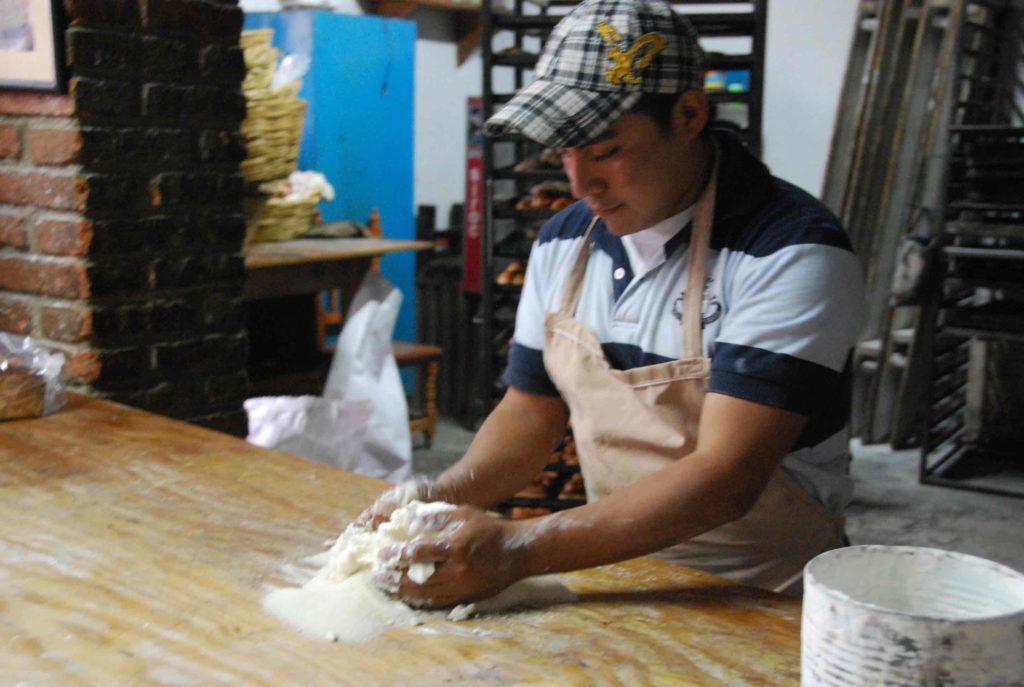
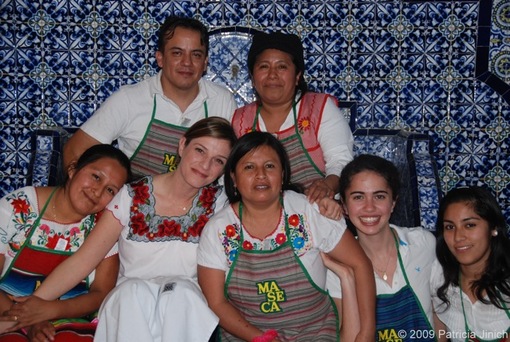
This panaderí­a, named Santa Marí­a, like most in Mexico, has 2 daily shifts for making fresh breads of all sorts. On the second shift of a Monday afternoon, Mrs. Agustina López, who runs the bakery, saw my little battalion and announced that they give baking classes to little cooks.

As the kids got a very hands-on class from her son Félix, master baker there, I soaked up all their secret ingredients and techniques, which they were very happy to share.

Conchas 1

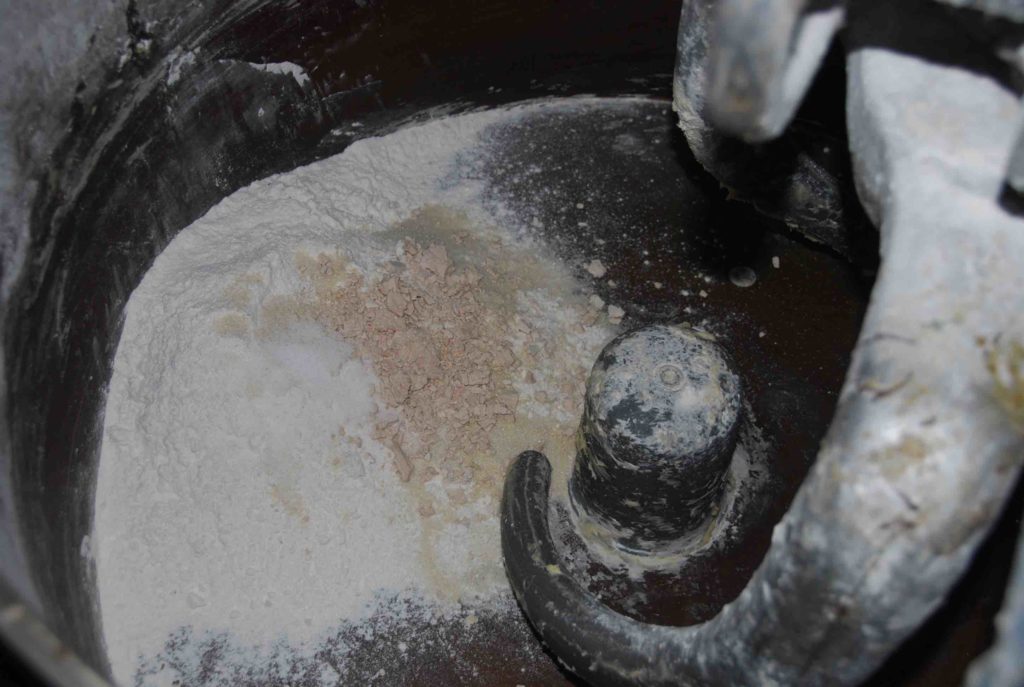
First of all, they have a beautifully aged and seasoned giant mixer. The kids took turns throwing (yeah, throwing) the flour, salt, yeast, water…

Conchas 2

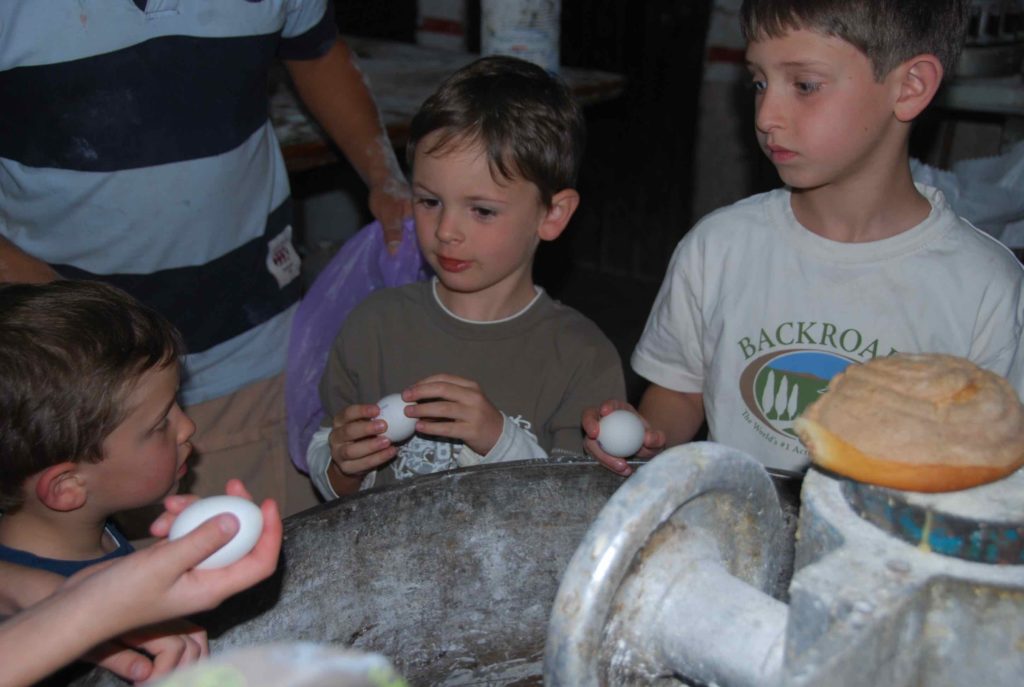
They were attempting to also throw the eggs into the mixer. See? I had to put my camera down to convince them that really, those eggs needed to be cracked first, though it seemed more fun to throw them all in. Just like that.

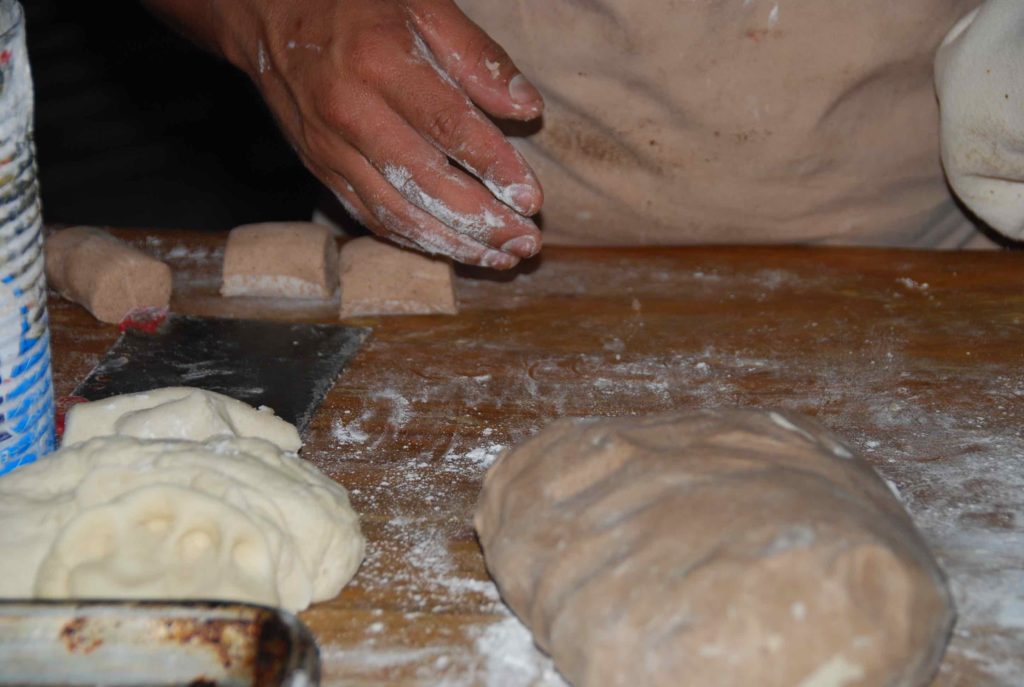
After, the roaring giant mixer helped knead a soft, gooey, elastic and very moist batter.

Conchas 3

Félix showed them what that dough felt like. Then he left it to rise, and took it to another giant piece of equipment: a batter cutter.

Juju seemed to not believe his luck with those beautiful pre-cut pieces of dough… All the possibilities!

Conchas 4

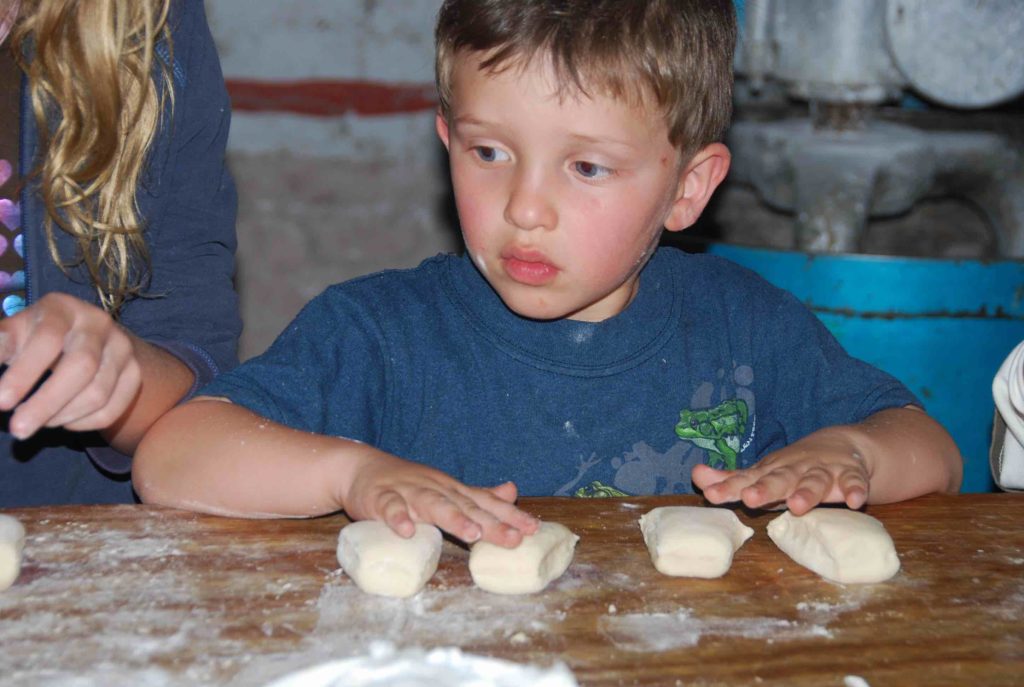
After the kids shaped them into thick, flattened rounds, Félix demonstrated how to make the sugar cover.

Conchas 5

Which was even more fun to make, because all you do is mix together flour, confectioners sugar and a heaven-full of butter with your hands until soft.

Conchas 6

Half that sugar cover is mixed with cocoa powder, because some people prefer their conchas chocolatey… Or some little cooks like to throw in something else to get even more messy…

Conchas 7
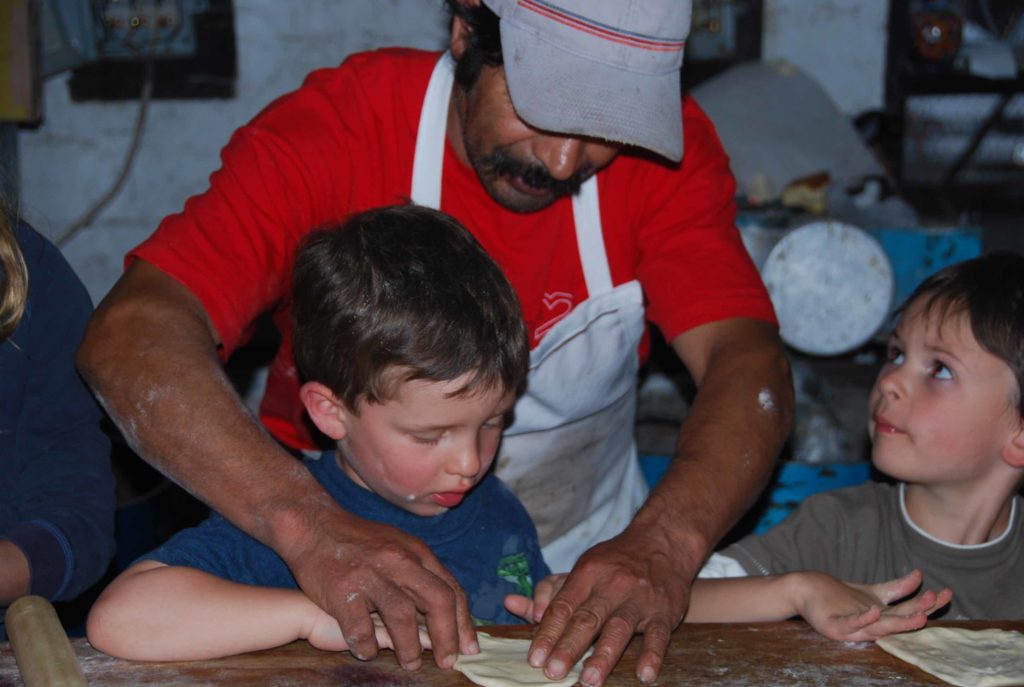
The kids were concentrated on making that sugar cover just about right before layering it on the concha dough flattened balls… Félix’s bakery assistant was so kind and patient with the kids.

Conchas 8

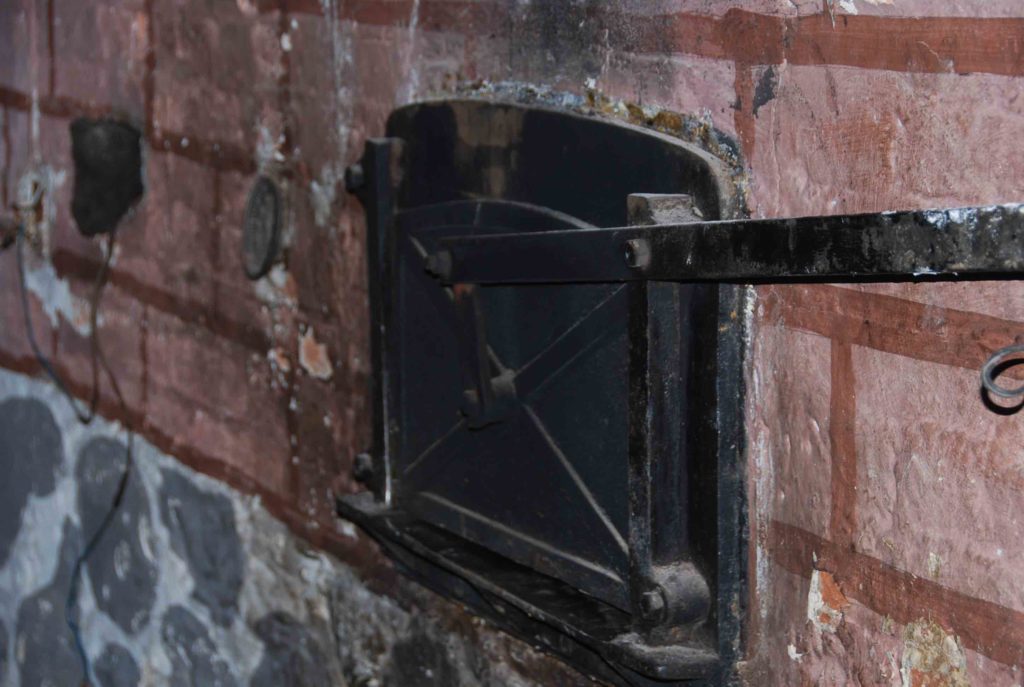
Now that is one charming looking oven. The moment I saw it, I imagined how just about anything baked in there has to taste so yummy…

Conchas 9

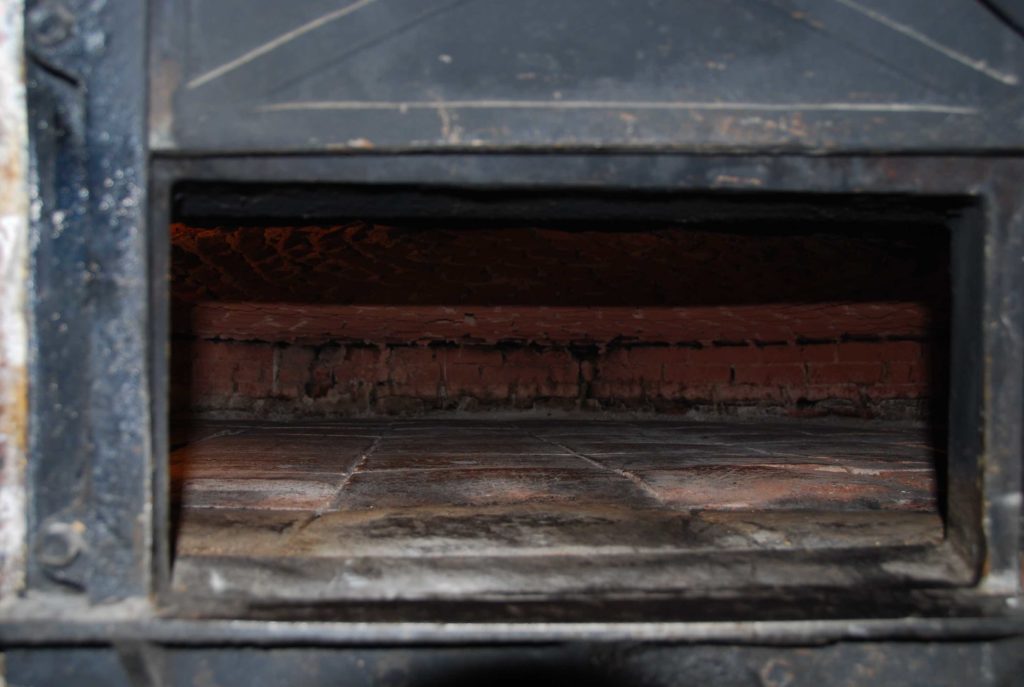
With the bottom made out of aged earthenware tiles and brick walls…

Conchas 10

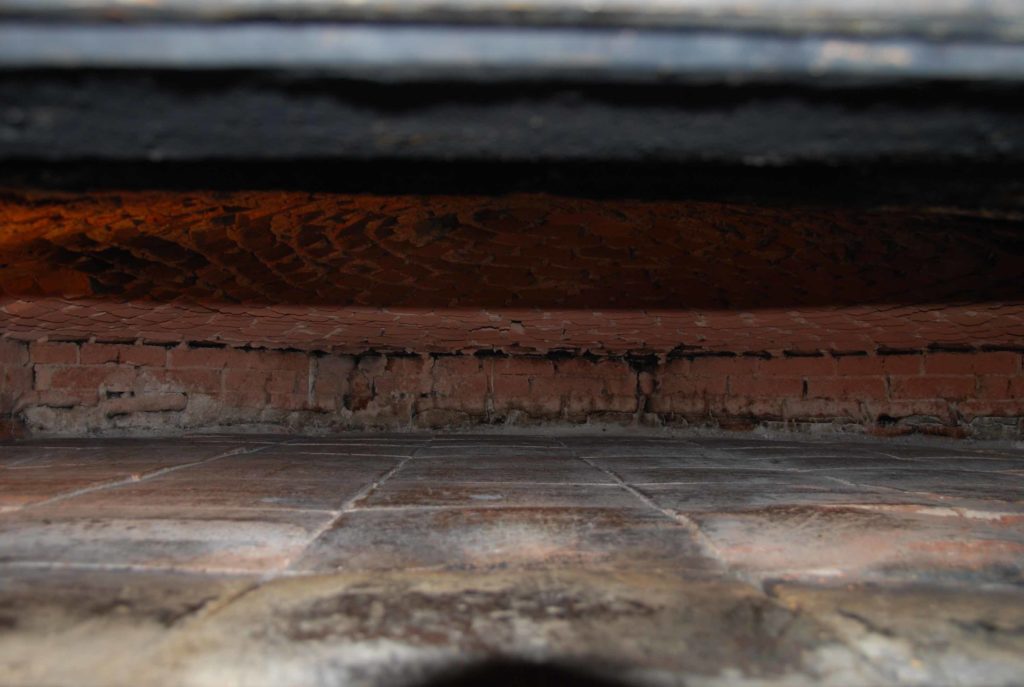
And one can just dream of how many conchas can fit in there…. 500, 1000, 2000… Each one to be eaten in just…. two….  big…. bites.

And some whole milk on the side.

Print Recipe
4.17 from 6 votes

Conchas

Conchas are named after the shape of their sugar topping, which resembles a seashell. Conchas do have a hardened crust, but it is sugary, thick, crispy and crumbles right into your mouth as you take a bite. Right after you brake through that crust, there is a fluffy, soft, sweet roll made with flour, butter, yeast and eggs.  With such a pleasing experience, no wonder it is one of Mexico’s most favorite sweet rolls or pan dulce.
Prep Time4 hours 25 minutes
Cook Time20 minutes
Course: Breakfast, Dessert
Cuisine: Mexican
Keyword: bread, Dessert, dough, pan dulce, pati's mexican table, Recipe, rolls, sugar
Servings: 16 to 18 conchas
Author: Pati Jinich

Ingredients

For the dough:

  • 14 ounces or 2 3/4 generous cups all-purpose flour
  • 2 eggs
  • 1 egg yolk
  • 1/4 teaspoon salt
  • 2 packets (7 grams or .25oz each) dry active yeast
  • 1/2 cup lukewarm water
  • 4 ounces unsalted butter or vegetable shortening at room temperature
  • 5 ounces or 3/4 cup sugar

For the sugar topping:

  • 1/3 pound all-purpose flour
  • 1/3 pound confectioners' sugar
  • 5 ounces unsalted butter or vegetable shortening, at room temperature, diced
  • 1 1/2 tablespoons cocoa powder if you want to make half be chocolate flavored
  • Extra butter or vegetable shortening to assemble the conchas

Instructions

  • Add the all purpose flour to the mixer, set with the dough hook, along with the eggs, egg yolk, and salt. Start the mixer over low speed. Meanwhile, add the active dry yeast to 1/2 cup lukewarm water and stir until creamy and well dissolved. Stir it into the flour mixture, and let it continue beating, now over medium speed, for about 3 to 4 minutes.
  • Incorporate the unsalted butter, keep on beating for 3 to 4 minutes more. Lastly, add the sugar and continue mixing for another 3 to 4 minutes or until the dough is gooey, sticky, elastic and very smooth.
  • With a spatula, push the dough into a mixing bowl greased with butter or vegetable shortening, cover it with a kitchen towel and place it in the warmest area of your kitchen, where there are no wind currents. Let the dough rise for at least 2 and up to 8 hours. It should have doubled in size.
  • For the sugar topping, place the flour and confectioners' sugar in a large bowl. Using your hands, incorporate the diced butter into the flour mixture. Mix and knead it until its smooth and homogeneous. If you want half the conchas to be chocolate flavored, separate half of the mixture in another bowl, and mix it very well with the cocoa powder. Cover the sugar toppings with plastic wrap so they won't dry out.
  • To assemble the conchas, grease thick baking sheets with butter or vegetable shortening and keep your hands greased. They will need to be greased for you to shape the dough. Using your hands, make about 2 inch balls with dough. Then, slightly press them flat, as in a thick disk, but not a tortilla. Leave about 2 inches in between each of the conchas so they will have room to expand.
  • Once your baking sheet is filled with the dough disks, cover them with the sugar coating. To do this, grab about a tablespoon of sugar coating, plain or chocolate. Make a round ball with your hands and then flatten it thin, like a tortilla. Place it on top of the dough disk and slightly press down. It should cover most of the surface.
  • If you have a concha mold, press it on the sugar topping. If you don't have one, cut through the sugar topping making round lines or any decoration that reminds you of a shell.
  • Leave the prepared conchas in a warm area of your kitchen, uncovered, and let them rise again, for about 2 to 4 hours.
  • Preheat the oven to 350 degrees. Place the conchas in the oven for about 20 to 24 minutes, until the conchas are slightly browned around the edges and look fluffed up.

Hibiscus or Jamaica Flowers

Originally from Africa or India, hibiscus flowers arrived in Mexico in colonial times and have become deeply integrated into Mexican cuisine. Often used to prepare agua de jamaica, or freshly flavored water, fruit popsicles or Jell-O, the dried flowers infuse the liquid with a deep, vivid red color.

They are not just any Hibiscus flower though. These are “Hibiscus Sabdariffa” also known as Roselle. In Mexico known as Jamaica, it is well known in Mexico that the flowers contain helpful diuretic and digestive properties, as well as high levels of vitamin C and other minerals. These days it is easy to get them in many stores in the US or online. They can be incorporated into many other dishes to add a peculiarly tangy taste, similar to cranberries.

When I was younger I used to enjoy playing with the flowers and pretending to make magical potions in my family’s kitchen.  Now that I am grown up, I keep on playing with them in my own kitchen! More modern takes of Jamaica include it in sauces for meats, vinaigrettes for salads and different kinds of desserts.

Do You Dare? Habanero Salsa!

This salsa does hurt.

But just a little.

Yet it goes oh-so-well with the Pollo Pibil, which together with red pickled onions makes for a delicious Yucatecan meal. A bowl of this Habanero salsa is standard on just about every table in Yucatán. Around there, people drizzle some spoonfuls, or drops, on just about everything.

I recently found this salsa is heavenly combined with Louisiana style Bar-b-que and some baked beans (!). While it can make people very unhappy if not given a warning of how spicy it is, for the Yucatan class we had in December, the 20 batches made were gone before the middle of the meal. We did give our guests a warning… While my cooking team kept saying I was making too much, we made some bets, and much to my surprise, I won. I have learned now, that the American and international palate is much more open, than say a decade ago, for spicy foods.

Market pics-thumb-510x342-403
So Habaneros have become wildly popular throughout the world. Aside from their cute, happy and beautiful appearance, they are one incredible source of heat and are used to make many hot sauces that heat aficionados, like my uncle, crave for.

The photo above shows some Habaneros my husband shot at the market in Mérida, Yucatán. The photo below, are Habaneros I found here in the DC area.

Habanero2.JPG
This wickeldy hot sauce is really easy to make at home. Just char the chiles and garlic cloves either in a broiler, a dry skillet or a hot comal (as I did below for the 20 batches of salsa for the Yucatán cooking class and dinner).

Habanero4.JPG
Then, please seed the chiles.

Believe me.

You must!

While I have gotten many requests for very spicy hot sauces from some of you, dear friends… please seed the Habaneros. If not, instead of wickedly-spicy salsa, you will have a somebody-please-help-me-or-I shall-die-from-this-heat salsa.

Once charred and soft, place the seeded chiles and peeled garlic cloves in the blender or your molcajete, and puree or mash away with some salt and either bitter orange or its substitute (1/4 orange juice, 1/4 grapefruit juice, 1/4 lime juice and 1/4 vinegar).

Habanero7.JPG
One of the nice things about using a molcajete, aside of exercising your arm a bit, is that the molcajete stores oils, flavors and aromas of the ingredients previously used. The molcajete adds a hint of those flavors, and its stored memories, into future concoctions.

If you dare try this salsa (hey! come on, why not?), please let me know, after you get over the shock.

Print Recipe
5 from 6 votes

Habanero Salsa

This salsa does hurt. But just a little. Yet it goes oh-so-well with the Pollo Pibil, which together with red pickled onions makes for a delicious Yucatecan meal. A bowl of this Habanero salsa is standard on just about every table in Yucatán. Around there, people drizzle some spoonfuls, or drops, on just about everything.
Prep Time5 minutes
Cook Time5 minutes
Course: Sauce
Cuisine: Mexican
Keyword: bitter orange juice, chile, garlic, habanero, Recipe, Salsa, Vegetarian
Servings: 1 cup
Author: Pati Jinich

Ingredients

  • 4 habanero chilies charred (seeded if you want to try to reduce the heat)
  • 6 garlic cloves toasted or roasted and then peeled
  • 1 cup bitter orange juice or its substitute (1/4 cup grapefruit juice, 1/4 cup orange juice, 1/4 cup lime juice and 1/4 cup white distilled vinegar)
  • 2 teaspoons kosher or sea salt more or less to taste

Instructions

  • Char the habanero chiles and garlic cloves with their skin on either a comal or dry skillet over medium heat, on the grill or under the boiler. In either case, it will take anywhere from 4 to 9 minutes, flipping once or twice in between. You know they are ready when their skins are charred and toasted and they have softened, without having burnt the flesh.
  • For the traditional take, peel the garlic cloves and place, along with the chiles, in a molcajete or mortar. Smash until fairly smooth. Add the salt and the bitter orange, or its substitutes, and mix until well combined.
  • Alternatively, place the ingredients in the blender or food processor and puree until smooth.

Notes

Salsita de Chile Habanero Tumulada o Kut

Habanero Chile

Habanero chiles are one happy looking bunch. They have colorful colors that go from green to the yellow, and then orange to red as they mature. They are small, cute, shinny and have waxy skin. But as much as their looks are inviting, they are the spiciest chiles in Mexican cuisine. They are incredibly fierce. With a rating of 300,000 to 350,000 on the Scoville scale for measuring hotness of a chili pepper, you can get an idea of how hot they are: Jalapeños go around 10,000 to 15,000.

Habaneros are a crucial ingredient for the regional cuisine of the Yucatan Peninsula. They are native of that region, though ironically, they are named after the Cuban city of Habana as they were traded there, heavily, centuries ago.

They are very easy to grow indoors and are beautiful to look at, so it is quite common to find them in kitchen pots, not only in Mexico!

Banana Pepper or Chiles Güeros

Banana peppers are called chiles güeros in many regions of Mexico. Güero, translates to blond, name given because of their pale, yellowish color. There are different varieties or banana peppers, but they are pale and light in looks, have waxy skin, and a similar flavor to Jalapeños. Their heat level can range from mild to hot.

There is a variety of banana peppers different from the one in this photo, that is a bit more elongated in shape, which is very popular for pickling. Banana peppers are sold in many stores in the DC-MD-VA area, but if you are unable to find them, you can substitute with Jalapeños.

More Chorizo to Love

Right off the bat, you must understand: I heart chorizo. Especially the kind I grew up eating in Mexico. It comes in deep-burnt-reddish links of fresh, moist, exotically seasoned ground meat that, once fried, becomes crisp and filling bites with bold flavors and a thousand uses. My oldest son’s quick choice for breakfast is chorizo fried until it browns and crisps, with a side of white toast.  Add some lightly beaten eggs as the chorizo is starting to brown and some ripe and creamy avocado slices on the side, and that’s my kind of rich-tasting brunch dish. Of course chorizo is delicious in sandwiches, in tacos and quesadillas, on top of enchiladas, in mashed potatoes, as a topping for heartier salads, in some of the tastiest bean dishes I have tried, in pastas with a ton of personality and on pizzas with pickled jalapeño peppers on top.

I am really trying to stop myself here…

When I moved to the United States, more than a dozen years ago, I was thrilled to find chorizo in international grocery stores. Lately, I have been intrigued and surprised to see that my Mexican chorizo is now accompanied by many other kinds in the refrigerated sections of bigger, more mainstream stores: Argentine, Colombian, Guatemala, Salvadoran and Honduran chorizos have arrived. Like the Mexican kind, some of those varieties are being made with chicken, turkey or beef in addition to pork. There is even kosher chorizo, made with beef, at Koshermart in Rockville and vegan chorizo at Trader Joe’s (which I haven’t felt the urge to try). Many come in spicy, spicier, spiciest and hotter than hot.

Through Sunday afternoon asados, or grilling parties, at friends’ houses and trips to Argentina, I had become familiar with the garlicky chorizo Argentinians are so proud of. But I was clueless about the other kinds. So I shocked my regular grocer by buying a variety of links, then cooked them at home to sample the differences, filling my kitchen with chorizo-tinged smoke. Later, on a cold and rainy day in November, I set out to explore the chorizo universe, including local manufacturers, in this part of the Americas.

It was clear from the start that Latin chorizos share a common difference from Spanish ones. Most Latin chorizos are made with heavily spiced, freshly ground meat, and the must be cooked. Spanish chorizos typically are dried and smoked cured links of chopped meat, seasoned mainly with garlic and paprika; they tend to be ready-to-eat and have a salami-like soft and chewy bite.

Although Spaniards introduced the pid and the techniques of making chorizo to most of Latin America, through the centuries chorizos were adapted with local flavors and ingredients. (The Spaniards, for their part, borrowed paprika from those new lads and made it one of their signature chorizo seasonings.) Interestingly, the version that took root in Latin soil was raw and uncured, which is the least-common kind in Spain.

Latin chorizos differ greatly from one another in flavor. Mexican is the spiciest of the lot. It also has the most complex layering of flavors, and I won’t deny that it’s my favorite. Mexican chorizos can have variations as well, but they generally contain dried chili peppers such as ancho, pasilla, guajillo and/or chipotle; a mix of spices that might include oregano, cumin, thyme, marjoram, bay leaf, cinnamon, coriander seed, allspice, paprika, achiote and cloves; most times garlic and sometimes onion; and always vinegar, which makes the meat flake or crumble as it browns and gives it a welcome hint of acidity.

If you like really spicy sausage, Chorizo Cabal of Fairfax produces a Mexican one called Perrón, which translates from Mexican-Spanish slang as brave or aggressive. It’s clear as soon as you see the label: A fierce dog looks ready to give you the bite of your life.

For a chorizo that isn’t spicy but has a colorful pungency, the way to go is Salvadoran. That happens to be the favorite of Clifford Logan Jr., vice president of the Logan Sausage Co. in Alexandria. His company sold 50,000 to 60,000 pounds of its Latin-style fresh chorizos in the Washington area last month. Logan is so passionate about chorizos that when asked to describe them, he seemed to be poetically describing bottles of wine: “The Salvadoran,” he began, with a deep romantic sigh and a sudden distant gaze, “has a robust flavor and a subtle finish.”

It seems that around Washington, Mexican and Salvadoran chorizos have been wrestling for bragging rights for a long time. Chorizo Cabal sells more Salvadoran chorizo than Mexican (except in grilling season, when the Argentine chorizo is most popular); Logan Sausage sells twice as much Mexican chorizo as Salvadoran. But the choice has as much to do with flavor and recipes as with the local immigrant population and the popularity of each cuisine. Companies often start to produce chorizos based on where the owner or employees come from; immigrants nostalgic for the flavors of home find a way to replicate their native recipes.

The companies’ Mexican, Honduran and Salvadoran chorizos are made with vinegar, yet the Honduran kind is much more sedate. The Guatemalan, Logan says, is somewhere in between the Salvadoran and Honduran, flavor-wise. Betty Guerrero, who runs Chorizo Cabal, agrees, and revealed to me that a bit of spearmint is added to Cabal’s Guatemalan spice mix. Colombian chorizo is plain and quite salty. The Argentine kind has white wine and a heavy dose of garlic in its mix, as well as oregano, nutmeg and a bit of cayenne or crushed red pepper flakes. It seems to me that Argentine-style chorizo really lets the flavor of the meat shine through. (See “Use this for that,” above.)

Of course, different brands and regions have different variations, which some purists question, especially when borders are crossed. Guerrero says, “My mother tells me that this is not the way chorizo is made in Mexico, that I am changing the ingredients, that I am changing its ways.” But Guerrero, an experienced chorizo maker, says her company sells about 50,000 pounds of chorizo per month.

One thing I have noticed is that chorizos made in the United States have less fat than those I knew and ate in Latin America. Logan and Guerrero confirmed that, saying their chorizos are made with no more than 20 percent fat. Typically, Mexican chorizo contains at least 30 percent fat. Whole Foods Market makes its own chorizo with no more than 15 percent fat, according to company spokeswoman Katie Hunsberger.

Another thing purists might question is why parts of the chorizo-making process are simplified here. For example, chorizo shops in Mexico soak and puree whole dried chili peppers and add fresh garlic and onion. Chorizo makers here, including Cabal and Logan, generally use custom-made prepared spice mixes that come with already-ground chili peppers and dehydrated garlic.

According to these producers, the mixes not only are convenient but also help ensure quality: “Dried garlic imparts flavor and doesn’t turn black as quickly as fresh garlic does,” Clifford Logan says. They also promote consistency. Hunsberger says that Whole Foods works with Barron’s spices to create a spice mix for its house brand.

No wonder chorizo makers are hesitant to share ingredient information. Their recipes are treated as highly classified state secrets that outsourced spice companies are legally forbidden to share. Dealing with such sacred formulas also may explain why many chorizo companies have longstanding and loyal employees.

Or maybe they just heart chorizo, like me.

Article written for and published by The Washington Post click here. 

Cowboy Charro Beans
Print Recipe
4.75 from 8 votes

Cowboy Charro Beans

Cowboy Charro Beans recipe from Pati's Mexican Table Season 1, Episode 2 “Foods of the Mexican Revolution”
Prep Time5 minutes
Cook Time25 minutes
Total Time30 minutes
Course: Side Dish
Cuisine: Mexican
Keyword: bacon, beans, black beans, Chorizo, jalapeno, pati’s mexican table, Peruvian beans, pinto beans, Tomatoes
Servings: 6 servings
Author: Pati Jinich

Ingredients

  • 6 oz sliced uncooked bacon chopped
  • 8 oz fresh uncooked Mexican chorizo casings removed, chopped
  • 1/2 cup white onion chopped
  • 1 jalapeño pepper finely chopped more or less to taste, seeded if desired
  • 1/2 lb roma tomatoes about 2 to 3 tomatoes, chopped
  • 1 tsp kosher or sea salt plus more as needed
  • 5 cups cooked pinto beans and their cooking liquid or substitute with black or Peruvian beans

Instructions

  • Cook the bacon in a large, deep skillet over medium-high heat for 3 to 4 minutes, until it is lightly browned and starting to crisp. Add the chopped chorizo; cook for 4 to 5 minutes, until it starts to brown and crisp. As it cooks, use a wooden spoon or spatula to break it into smaller pieces.
  • Add the chopped onion and jalapeño; mix well and cook for 1 or 2 more minutes, letting them soften a bit. Add the tomatoes and mix well; cook for 3 to 4 minutes, stirring, until the tomatoes soften and appear mushy.
  • Add the cooked beans and their cooking liquid; mix well and reduce the heat to medium. Cook for 8 to 10 minutes, until the beans are moist but not soupy. Add a bit more water if needed. Taste, and add more salt to your taste. Serve hot.

Notes

Frijoles Charros con Tocino y Chorizo
Mexican style pasta
Print Recipe
5 from 4 votes

Mexican Style Pasta with Tomato Sauce, Chorizo & Fresh Cream

Mexican Style Pasta with Tomato Sauce, Chorizo & Fresh Cream recipe from Pati's Mexican Table Season 1, Episode 9 “Chorizo”
Prep Time5 minutes
Cook Time35 minutes
Total Time40 minutes
Course: Main Course
Cuisine: Mexican
Keyword: Avocado, chipotles in adobo, Chorizo, mexican crema, pasta, pati’s mexican table, queso fresco, Tomatoes
Servings: 6 servings
Author: Pati Jinich

Ingredients

  • 1 1/2 lbs ripe Roma tomatoes about 6 to 8 tomatoes
  • 1 medium clove garlic
  • 1/2 cup tomato cooking liquid
  • 1/2 medium white onion coarsely chopped (about 1/2 cup)
  • 3/4 tsp kosher or sea salt
  • 1/4 tsp freshly ground black pepper
  • 8 oz fresh uncooked Mexican chorizo casings removed and coarsely chopped
  • 1 tbsp safflower or corn oil
  • 8 oz dried spaghetti, angel hair or fettuccine broken into smaller pieces
  • 2 cups chicken broth
  • 2 bay leaves
  • 1 to 2 tbsp sauce from canned chipotles in adobo plus 1 whole canned chipotle chile for more heat (optional)
  • 6 oz queso fresco, farmer’s cheese, or a mild feta crumbled
  • Mexican or Latin cream as much as needed (!) or substitute for creme fraiche or sour cream
  • 1 ripe Mexican avocado halved, peeled, cut into slices

Instructions

  • Place tomatoes and garlic in a medium saucepan. Add water to cover and bring to a boil over medium-high heat. Simmer for about 10 minutes, until the tomatoes are thoroughly cooked, they look mushy and the skins have started to come off.
  • Transfer the tomatoes, 1/2 cup of the cooking liquid and garlic to a blender along with the onion, salt and pepper. Let cool slightly and puree until smooth.
  • Cook the chorizo in a large, deep skillet over medium-high heat for 5 to 6 minutes, until it has browned and crisped; use a wooden spoon or spatula to break it into smaller pieces as it cooks. Use a slotted spoon to transfer the cooked chorizo to a bowl.
  • Add oil to the same skillet used to cook the chorizo, over medium-high heat. Add the spaghetti or fettuccine pieces and cook for a few minutes, stirring often, until the pasta changes color and starts to brown. Do not let it burn!!
  • Pour the tomato puree on the pasta. Cook for about 5 minutes, stirring often, until the sauce thickens and the color darkens to a deeper red. Add the chicken broth, bay leaves and adobo sauce, plus a whole chipotle chile in adobo, if desired.
  • Mix well, cook uncovered for 10 to 12 minutes, stirring often to keep the pasta from sticking, until the pasta is cooked through and the tomato sauce has thickened considerably. Discard the bay leaves.
  • Add the chorizo and stir to incorporate. Divide among individual plates; serve hot, topped with crumbled cheese, fresh cream and avocado slices.

Notes

Fideo Seco
Print Recipe
4.86 from 7 votes

Potato, Scallion & Chorizo Crispy Tacos

Potato, Scallion & Chorizo Crispy Tacos recipe from Pati's Mexican Table Season 1, Episode 9 “Chorizo”
Prep Time5 minutes
Cook Time20 minutes
Total Time25 minutes
Course: Main Course
Cuisine: Mexican
Keyword: Chorizo, corn tortillas, pati’s mexican table, potatoes, salsa verde, scallions, Taco
Servings: 5 to 6 servings
Author: Pati Jinich

Ingredients

  • 1 lb red bliss potatoes peeled and cut into 1-inch pieces
  • 8 oz fresh uncooked Mexican chorizo sausage casings removed, coarsely chopped
  • 8 scallions white and light green parts thinly sliced (1/2 cup)
  • 1 tsp kosher or sea salt or more to taste
  • 10-12 Corn tortillas
  • safflower oil for frying
  • Salsa verde or any salsa of your choice

Instructions

  • Bring a medium pot of water to a boil over medium-high heat. Add the potato pieces, once the water returns to a boil, cook for 10 to 12 minutes or until the potatoes are tender. Drain.
  • Place the chorizo in a large skillet over medium-high heat. As it cooks, use a wooden spoon or spatula to crumble it into smaller pieces. Once it browns and crisps, 5 to 6 minutes, add the scallions and stir to combine; cook for about 1 minute or until the scallions begin to soften.
  • Add the cooked potatoes and salt, mashing them into the chorizo mixture with a potato masher or a wooden spoon, for about 1 minute until well combined. Remove from the heat. Taste, add salt as needed.
  • Heat a dry, medium skillet over medium heat. Warm the tortillas in the skillet one at a time for 15 to 30 seconds on each side, to soften them for rolling and so they will not crack as you assemble tacos.
  • Place a few tablespoons of the filling on the center of each heated tortilla, and roll, as tightly as you can, into a taco. Insert a wooden toothpick through taco pairs, through the seams to help them retain their roll shape as they cook. When they have all been rolled, finish the tacos by either frying or toasting them.

To fry the tacos:

  • Pour enough oil into a large skillet to a depth of about 1 inch, place over medium heat. Once the oil is hot, 4 to 6 minutes, fry the tacos in batches, placing them in the skillet, without crowding them. They oil should be bubbling as they cook. Cook for about 2 to 3 minutes on the first side, until the bottom and sides have crisped and turned golden. Use tongs to turn over the tacos, cook for another 2 to 3 minutes. Transfer them to a plate lined with paper towels. Continue until all the tacos have been fried.

To toast the tacos:

  • Heat a large, dry skillet or comal over medium heat. Working in batches, place the tacos in the skillet. Let them toast and heat for about 3 to 4 minutes or until the tacos are browned and crisped, then flip to the other side and toast until evenly browned and crisp.
  • Remove all toothpicks; serve warm.

Notes

Taquitos de Papa, Cebollita y Chorizo
sweet potato salad
Print Recipe
4.60 from 5 votes

Warm Sweet Potato Salad with Chorizo

Warm Sweet Potato Salad with Chorizo recipe from Pati's Mexican Table Season 1, Episode 9 "Chorizo"
Prep Time15 minutes
Cook Time30 minutes
Total Time45 minutes
Course: Main Course, Salad
Cuisine: Mexican
Keyword: Chorizo, cilantro, jalapeno, orange juice, pati’s mexican table, sweet potato
Servings: 4 to 6 servings
Author: Pati Jinich

Ingredients

  • 3 lbs sweet potatoes peeled and cut into bite-size chunks, about 3 large sweet potatoes
  • 3 tbsp olive oil
  • 1 cup orange juice preferably freshly squeezed
  • 1/2 tsp brown sugar
  • 3/4 tsp kosher or sea salt
  • 1/4 tsp freshly ground black pepper
  • 8 oz fresh uncooked Mexican chorizo, casings removed and coarsely chopped
  • 1 jalapeño pepper stemmed and seeded if less heat is desired
  • 1/3 cup red onion chopped
  • 1/3 cup cilantro chopped

Instructions

  • Bring a large pot of salted water to a boil over high heat. Add the sweet potato pieces, once it comes back to a boil, reduce the heat to medium; simmer for about 10 minutes, until almost tender and a knife can go through without breaking a piece. Drain, and transfer to a baking dish large enough to hold the pieces almost in a single layer.
  • Preheat oven to 400 degrees.
  • Whisk together orange juice, oil, sugar, salt and pepper in a medium bowl. Pour the mixture over the sweet potatoes and toss to coat evenly. Roast for about 20 minutes, turning them after about 10 minutes, until the potato pieces have started to brown and the sauce has thickened. Remove from the oven.
  • Meanwhile, cook the chorizo in a medium skillet over medium-high heat; use a wooden spoon of spatula to break it into smaller pieces as it cooks. After 5 to 6 minutes, when it has nicely browned and crisped, use a slotted spoon to top the hot sweet potatoes.
  • Sprinkle the jalapeño, red onion and cilantro on top, and toss gently to combine. Serve warm.

Notes

Ensalada Calientita de Camote y Chorizo

Tomatillos

Although they are widely available in the US, I don’t think I have met more than a couple people here who use fresh tomatillos in their cooking. It may be partly because people are not familiar with them or how to cook them, but…. they are not an appealing ingredient as far as looks go with the first impression! But let me tell you why you should definitely give them a try.

They are from the tomato family, but are much firmer than red tomatoes and less juicy. They are green and covered with a papery husk, that tends to be speckled with dirt and sometimes randomly torn or stuck to the flesh of the tomatillo. This is because the skin of the tomatillo is a bit sticky and waxy. They also have a somewhat humid aroma, from the moisture caught in between the skin and the husk along their travels and storage time.

However, don’t let yourself be deceived by their cover and first appearance. Once you bring them home, peel the husk and rinse them off, you will see what a beautiful ingredient they are. They have a sensuous shape and a deep green shiny color. You will see even more beauty once you try their flavor and see all the things you can use them for.

In my opinion, they are one of the most unique ingredients in Mexican cooking. A bit tart, in a very peculiar way, they work wonderfully along spicy and sweet ingredients.

To buy them, don’t be shy about touching them. You have to confirm they are firm, with a bright green color and not mushed, wrinkled or colorless, signs of being old and bitter. They should be fresh and you can tell by the husk which should be papery, regardless if it sticks to the tomatillo or not. So grab the tomatillo and peek inside the husk to see what you are getting before you put it in your basket!

Calabacita italiana or Italian zucchini

I think the most commonly used zucchini in Mexican cooking is either what in Mexico is called the calabacita italiana, or Italian zucchini, or the calabacita bola or round squash, which is similar to the Italian but rounder and smaller and used a lot in French cooking. Italian zucchini is different from the regular green zucchini found in most US stores, in that the later is large, thick and has a uniform dark green color. The Italian zucchini is smaller, a bit rounder with a chubbier appearance, and has a lighter green color that is randomly speckled with a cream color and is milder and sweeter in flavor.

See the Italian zucchini pictured above. As the years have gone by, I have seen them more frequently at international and Latino stores as well as some Farmers Markets here in the US.

Below see the Italian zucchini on top of the regular green zucchini so you can compare its looks. Now you have to bring them home to taste the differences (!). Though you can substitute one for the other in recipes, the Italian is a bit milder and sweeter.

Calabacita italiana 1


Comfort me with Café de Olla (or Coffee from the Pot)

As we returned from our 10 day vacation to Mexico this December and walked out of the Dulles airport, I felt my bones freeze. Say what? I told my husband, I think I am turning around and catching the next flight back to Mexico.

Now we are home, with the heating so high it seems we moved to the Equator. And I admit that the cold and especially the snow, which I am watching right this minute through my kitchen window starting to magically fall from the night sky, is one of the things I love about living in the Eastern United States. We can experience the full change of seasons.

So instead of complaining, this is what I do: I take out my Piloncillo, or brown sugar, my bark of Ceylon or True cinnamon, some dark roasted coffee and make myself a Café de Olla.

The Café de Olla is one of the most comforting things I can think of. Not only for when its cold outside. It is also wonderful to soothe the end of a rich meal or to start a cold morning with some cookies or toast on the side, or rather, dipped inside the coffee.

It is called Café de Olla because for centuries it was prepared, and still is in some parts of Mexico and Mexican homes, in clay pots. Pot translates to Olla in Spanish, so that explains the funny translation to Coffee from the Pot. The clay pot imparts a peculiar earthy and deep flavor to the coffee. But if you don’t have a clay pot, that should not stop you from making it. The combination of coffee with piloncillo or dark brown sugar and cinnamon is extraordinary by itself as well.

As I am gearing up for an exciting 2010 with fascinating topics to research and recipes to try and test for the next series of classes at the Institute, there is one thing I realize never ever changes in each single menu we offer: there is always Cafe de Olla after the end of the meal for our guests. Our regulars demand it. And me and my cooking team can’t start the day without it.

Comfort Me with Cafe de Olla 2-thumb-510x342-661
With the spirit of continuing to welcome 2010, from my cooking team and myself -we have been so lucky to have been together for almost three years- we wish you a delicious 2010 filled with Café de Olla to warm your soul, your belly, your cold mornings and late nights.

cafe de olla 2
Here I am holding on to one, for dear life, while the winter lasts…

Print Recipe
5 from 5 votes

Café de Olla

The Café de Olla is one of the most comforting things I can think of. Not only for when its cold outside. It is also wonderful to soothe the end of a rich meal or to start a cold morning with some cookies or toast on the side, or rather, dipped inside the coffee.
Cook Time10 minutes
Course: Drinks
Cuisine: Mexican
Keyword: cinnamon, coffee, piloncillo, Recipe
Servings: 6 servings
Author: Pati Jinich

Ingredients

  • 9 cups water
  • 6 tablespoons coarsely ground dark roasted coffee
  • 4 ounces piloncillo or about 8 to 9 tablespoons grated (can substitute for dark brown sugar) and can add more or less to taste, depending on how sweet you like it
  • 1 cinnamon stick

Instructions

  • Heat water in a pot. When it comes to a rolling boil, lower the heat to low and add the coffee, piloncillo and cinnamon stick. Simmer for about 5 minutes, give it a couple stirs and turn off the heat. Let it sit covered for about 5 more minutes. Strain before serving with a fine strainer or cheesecloth. Or then again, pour into a french press, press down and serve.

My Three Little Piggies

Piggies can be found in many places under different names: marranitos, puerquitos, cerditos, cochinitos. All these words are used to describe a Piggie in endearing ways. In some places, they are given different animal shapes, but still called in one way or another “Piggy.” That may be because that was their original shape.

They really should be called Flying Piggies and have wings attached given how fast they fly away from my kitchen each time I make them.  Sometimes it is even hard to bake them, since my boys find the dough irresistible: its gooey, sticky, and deliciously sweet.

Piggies 1
Now, don’t think I didn’t see that little Piggie…

Piggies 2
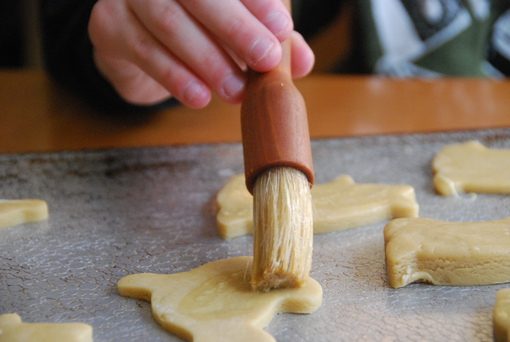
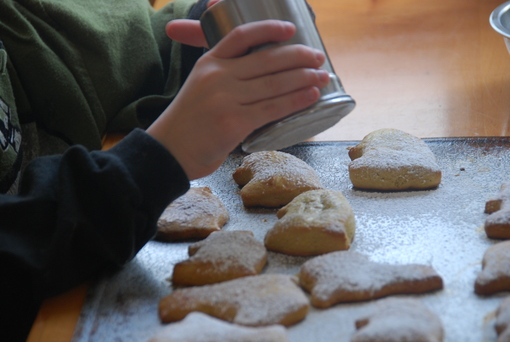
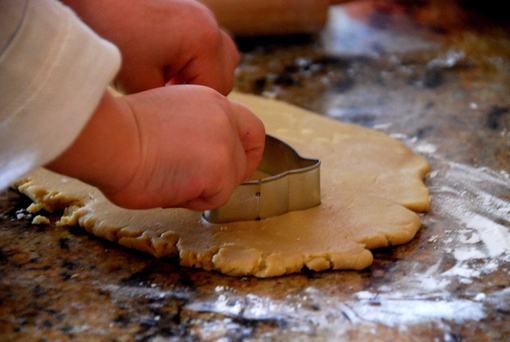
After they sneak away and find ways to eat some dough, they have a hard time waiting for it to harden in the refrigerator, so it can be easy to roll it out and give it fun shapes.
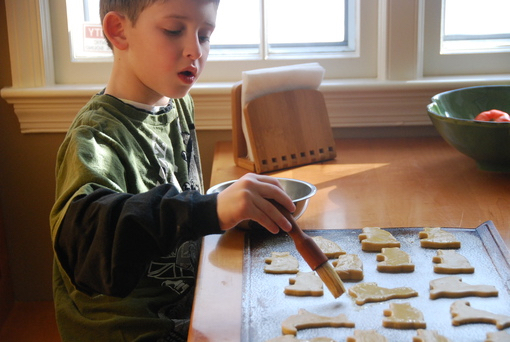
More often than not, the Piggies end up looking like fierce lions or magical dragons.

One of the reasons I love these cookies, is because my middle Piggy, my pickiest eater, loves them. He enjoys every part of the process to make them, except waiting for the dough to be ready.

Piggies 3
He takes brushing them with lightly beaten egg incredibly seriously.

Piggies 4
No easy task, you see?

And oops! There are some dinosaur shaped Piggies there too…

Piggies 5
He loves adding confectioners’ sugar. Especially after I have said, “I think that’s enough baby.”

Most of all, he loves eating them. Which makes me happy because I know all the good stuff that’s in them.

With firm and clean edges, Piggies are deceiving.  You can’t tell that their texture is so soft and almost bread-like until you take a bite. They also have a wholesome and small Pueblo flavor.  I think that’s because the main ingredient, Piloncillo is simply sugar cane juice, typically shaped into cones.  It’s easy to find, but you can also substitute it with brown sugar and get the same charming feeling.  Combine all the above characteristics and you get an incredibly comforting cookie.

Piggies 6
There goes my oldest Piggy, jumping in to get one, even before they have cooled down…

P.S. Piggies are perfect to accompany a hot cup of coffee or tea… Also, keep them covered, so they will remain soft and fluffy.

Print Recipe
4.60 from 5 votes

Piggies

Piggies can be found in many places under different names: marranitos, puerquitos, cerditos, cochinitos. All these words are used to describe a Piggie in endearing ways. In some places, they are given different animal shapes, but still called in one way or another “Piggie”. That may be because that was their original shape.
Cook Time7 minutes
Course: Dessert
Cuisine: Mexican
Keyword: ceylon, cinnamon, cookies, Dessert, honey, piloncillo, Recipe
Servings: 30 medium-sized cookies
Author: Pati Jinich

Ingredients

  • 12 ounces piloncillo chopped or grated, or substitute for 1 3/4 cup packed brown sugar
  • 3/4 cup water
  • 1 true or ceylon cinnamon stick about 2-inch to 3-inch length
  • 2 sticks or 1 cup unsalted butter at room temperature
  • 2 tablespoons honey
  • 4 1/4 cups all-purpose flour may need a bit more
  • 1 teaspoon baking powder
  • 1 teaspoon baking soda
  • 1/2 teaspoon salt
  • 2 eggs at room temperature lightly beaten
  • Butter to grease cookie/baking sheet
  • 2 to 3 tablespoons all-purpose flour to roll out the dough
  • 1 egg lightly beaten to be used as glaze
  • Confectioners' sugar to sprinkle on top optional

Instructions

  • In a saucepan, combine the grated piloncillo or dark brown sugar with the water and cinnamon. Heat over medium heat, once it simmers, adjust and lower heat to keep it at a low-medium simmer for about 15 minutes, or until it thickens to a light syrup consistency. Turn off the heat and remove the cinnamon stick. You should have now about 1 1/4 cups piloncillo liquid. Add the butter and the honey into the hot liquid, and stir until it dissolves.
  • In a mixing bowl, mix the flour, baking powder, baking soda and salt. Make a whole in the center and pour the piloncillo mixture. With a spatula mix it all together in a circular motion until it is well incorporated. Lightly beat 2 eggs and incorporate them into the dough. The dough will be sticky and gooey.
  • Place enough plastic wrap in the bottom of a mixing bowl to have wings on the sides. With a spatula, push the dough onto the plastic wrap, wrap the dough, and refrigerate anywhere from 3 hours to overnight.
  • When ready to make the cookies, preheat oven to 375℉ degrees. Grease a couple cookie/baking sheets with butter. If using one sheet you may need to do a couple batches.
  • Remove dough from the refrigerator. On a counter top, sprinkle a couple tablespoons of flour. Rub a bit of flour on the rolling pin as well. Roll dough until you have about 1/4" thickness. Using piggy cookie cutters (or other shapes, but then you may need to change the name!), press down on dough, moving a bit on the counter top, to make it easier to lift the shaped dough.
  • Place Piggies on the baking sheet as you shape them along. Gently brush cookie tops with the lightly beaten egg. Roll the extra already used dough, wrap with plastic wrap, and place in the freezer for at least 10 minutes before using again, or it will be too soft and sticky. Repeat to make remaining cookies.
  • Bake cookies in the middle rack of the oven anywhere from 7 to 9 minutes. Remove from the oven and place on a cooling rack. You may sprinkle confectioner's sugar on top. Keep them covered so they remain soft.
  • Kids love to eat them with a tall glass of milk, I like them with a hot cup of coffee.

Notes

Chochinitos: Galletas de Piloncillo y Canela