Corn: In a bowl or on a stick

In Mexican cooking, corn is eaten and drank, in just about every possible way. Esquites, freshly shaved corn usually cooked in a buttery broth with epazote leaves and Serrano chile, is one of the most popular takes. So much so, that my boys counted eight Esquite street carts in the small down town square of Chihuahua, when we were there last month.

It is very common to walk through the streets in a Mexican city or village, no matter how tiny it may be, and find a wide array of street food stands boasting the dishes that Mexicans abroad hanker for the most: Antojitos, or little cravings. Each one being a universe compounded with layers of flavors, in its own right.

Corn in a bowl or on a stick 2a-thumb-510x342-2014
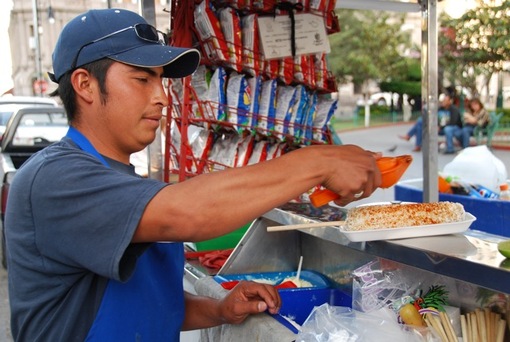
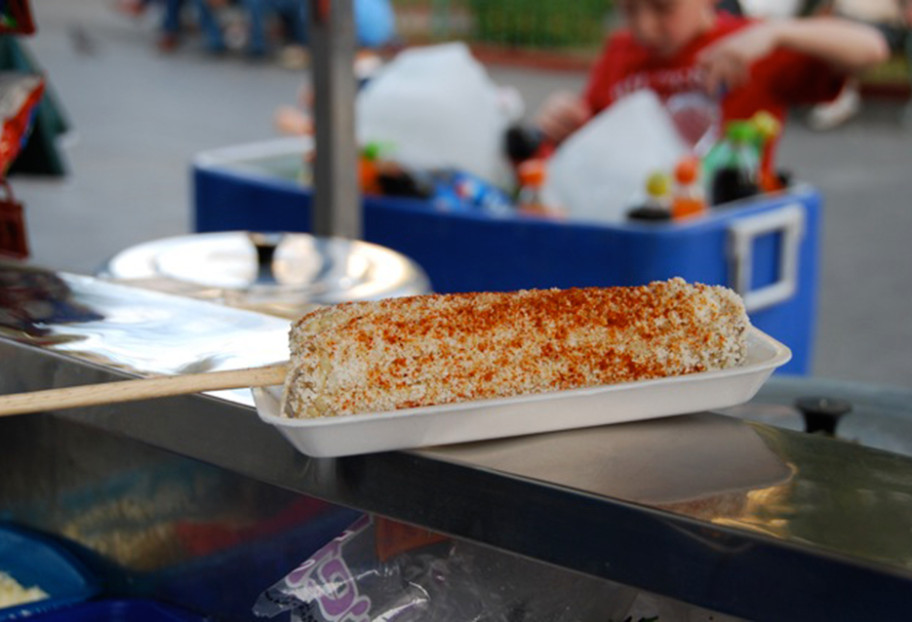
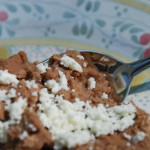
Esquites, as most of the Antojitos, is a very versatile dish. You may eat the whole cooked corn on a stick, or shaved off the cob, cooked and seasoned and served in a cup. Then, you can dress it up or dress it down according to your mood, with the traditional and complementing garnishes of mayonnaise or Mexican cream, crumbled salty Cotija or aged cheese, lime juice, salt and ground dried piquí­n chile.

I just shared it last week with the Fox midday news team.

My boys, of course, prefer the more hands on way of eating it, on a stick. They each have their personal spins. My middle one likes it with just butter, mayo and crumbled salty cheese. On top of that, my little one adds salt and some drops of limejuice. My oldest one proudly eats it, “with a lot of absolutely everything” which just means adding ground chile piquin to the later mix, but heavily loaded on all fronts.

It is a good time to try it now that we start to see the beautiful fresh corn in the markets. It is up to you to decide if you want it nice and neat in a cup or deliciously messy on a stick.

Print Recipe
4 from 3 votes

Cooked and Seasoned Corn

In Mexican cooking, corn is eaten and drank, in just about every possible way… Esquites, freshly shaved corn usually cooked in a buttery broth with epazote leaves and Serrano chile, is one of the most popular takes. So much so, that my boys counted eight Esquite street carts in the small down town square of Chihuahua, when we were there last month.
Prep Time5 minutes
Cook Time13 minutes
Course: Antojos, Side Dish
Cuisine: Mexican
Keyword: Antojo, chile, Corn, cotija, epazote, lime, mayonnaise, mexican crema, piquí­n chiles, queso anejo, Recipe, serrano chiles, Vegetarian
Author: Pati Jinich

Ingredients

  • 2 tablespoons unsalted butter
  • 1 tablespoon safflower or corn oil
  • 1 serrano chile or more to taste, chopped (seeding optional for less heat)
  • 8 cups fresh corn kernels from about 12 ears of corn
  • 2 cups water
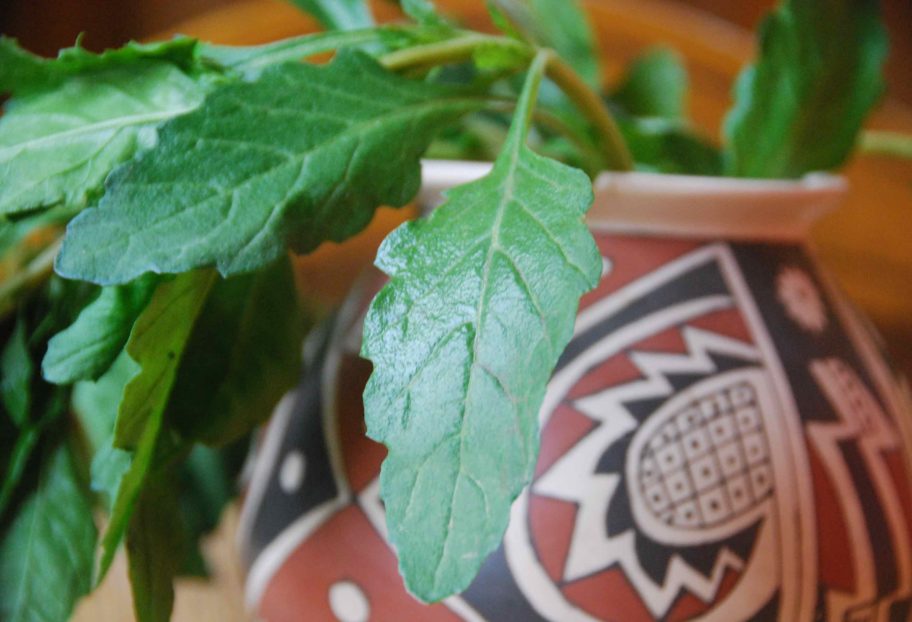
  • 2 tablespoons fresh epazote leaves chopped, or 1 whole leave dried, optional
  • 1 teaspoon kosher or sea salt or more to taste
  • 2 limes or about 4 tablespoons of fresh lime juice
  • 1/4 cup mayonnaise or Mexican cream
  • 1/2 cup crumbled Cotija fresco or añejo cheese
  • Dried ground Piquí­n chile to taste

Instructions

  • Melt the butter together with the oil on a cooking pot over medium-high heat. Add the chopped chiles and let them cook for about 20 to 30 seconds, moving them around.
  • Incorporate the corn, chopped fresh epazote leaves or dried epazote leaf, water and salt. Stir it all up and bring to a simmer. Cover with a lid, bring heat to medium-low and cook for 12 to 14 minutes, until the corn is cooked but still tender. Turn off the heat. You may leave the corn in the pot for a couple hours.
  • Serve corn in cups or small bowls. Let your guests add to their liking the fresh limejuice, mayonnaise or Mexican cream, crumbled cheese, powdered chile piquí­n and salt.
  • You may also cook the whole corn in salted water with the epazote leaves. Once it is cooked and ready, garnish with the same ingredients.

Notes

Esquites

Epazote

The epazote herb is one deeply Mexican ingredient that has no substitute that I know of. It has a very unique, clear and deep flavor that adds a lot of character to a dish. Hard to describe, it has that I don’t know what, that somehow makes a distinct difference.

Epazote leaves are pointy, serrated and dark green. It grows about everywhere in Mexico and can be found fresh in many markets in the US. It can also be found dried and packaged, but with a much milder flavor.

A comfy soup for the still chilly nights

While most of us in DC have stacked our winter clothes up in the attic or inside a trunk, the truth is, it’s still a bit chilly. So today I made this mushroom soup, yet again. I should be tired of it already, since I just cooked 100 portions of it for last Friday’s cooking class at the Institute and I had tested it for weeks… But here I go.. It is just too good!

It is not your typical soup at all. It has the woody and earthy feel of the mushrooms, but their flavor is somehow enhanced by the chile de árbol. It may sound strange, since one would think that chiles mask the flavor of ingredients. But depending on how you use them, they can pronounce rather than overpower other flavors.

Although the chile de árbol is quite spicy, in this soup you can taste its depth but not its heat, since they are browned but never opened. This is one of the subtle ways to use them, as the seeds and veins which contain most of the heat are bundled up inside throughout the cooking.

Luckily, these chiles can be found almost anywhere these days. Like other dried chiles, they are a very smart staple to incorporate into your pantry since they last forever, they are filled with Vitamin A (great excuse to indulge…) and they can enrich your home cooking immensely.

The soup has a flavorful roasted tomato base. You can buy the already roasted tomatoes, but down below I tell you how to roast or char them yourself. It takes no more than 10 minutes, it is rather simple and it gives the soup a nice rustic feel. I include the epazote in the end, but if you don’t find it don’t worry, it is optional. It just gives it a nice accent.

It takes about 25 minutes to make this soup. Go for it! You can make a double batch and reheat it the next day for lunch, accompanied with some sliced toasted baguette or bolillo, and a slice of ripe Mexican avocado on top.

Print Recipe
5 from 3 votes

Mushroom, Chile de Arbol, and Roasted Tomato Soup

Prep Time5 minutes
Cook Time35 minutes
Course: Soup
Cuisine: Mexican
Keyword: Avocado, bolillo, chicken broth, chile, chiles de arbol, epazote, garlic, Mushroom, onion, pati's mexican table, Recipe, soup, Tomatoes, Vegetarian
Servings: 4 to 6 people
Author: Pati Jinich

Ingredients

  • 1 1/2 pound, or 6 to 7, ripe roma/guaje tomatoes
  • 3/4 cup white onion roughly chopped
  • 4 garlic cloves peeled
  • 2 tablespoons safflower or corn oil
  • 1 tablespoon butter
  • 3 chiles de arbol
  • 2 pounds mushrooms rinsed and sliced
  • 1 teaspoon kosher or sea salt or to taste
  • 8 cups chicken broth homemade or storebought
  • 2 fresh epazote sprigs may substitue for dried, optional
  • 1 ripe Mexican avocado peeled and sliced
  • 1 or 2 bolillos or small baguettes sliced and toasted, optional

Instructions

  • Char the tomatoes, onion and garlic, by placing them in a single layer on a baking sheet under the broiler. Alternatively, you can char them on the grill or on a hot comal, the traditional way. Whichever method you choose, tomatoes will take between 6 to 9 minutes, and the onion and garlic between 3 to 4 minutes. Turn them around halfway through.
  • Tomatoes are ready when they are completely cooked through, mushy and their skin is charred, blistered and wrinkled. Garlic and onion will have also charred and softened.
  • Place charred tomatoes, onion and garlic in the blender and puree until smooth. In a pot, heat one tablespoon of the oil and the butter over medium heat until butter starts to bubble. Add Chiles de Arbol and sautee for a couple minutes, turning them around, until they are lightly browned and crisp.
  • Add sliced mushrooms, sprinkle with salt, cover the pot and let them steam for 5 minutes.
  • In a soup pot, add a tablespoon of oil and heat over medium high heat. Stir the tomato puree into the pot. For a smoother feel, you can place a strainer on top of the soup pot, and strain the tomato puree into the pot. Let the puree simmer, season and thicken for about 4 to 5 minutes. Its color will darken and become deeper.
  • Stir in the chicken broth and simmer for 5 more minutes. Incorporate the mushrooms along with the chiles. Add the fresh epazote sprigs, if you want, and let it all simmer 5 more minutes. Taste for salt and add more if need be.
  • Serve very hot. If you wish, add a slice of avocado on top of each bowl of soup. It can be eaten with a side of toasted bolillos or baguettes as well.

Notes

Sopa de Hongos con Tomate y Chile de Arbol

The double life of an avocado

My friend Vered walked into my house carrying a pound of French feta cheese and some freshly baked pitas she found at a Middle Eastern store. It was the kind she used to cook with in her Israeli home. Just a taste made us realize how hungry we were, though we were not near any mealtime. Nonetheless, we had 20 minutes before we had to run, so that’s a great excuse for a snack.

The last beautifully ripe Mexican avocado I had in the basket was staring at me. So I offered to make a Mexican Farolada out of her pita, of course to top with some fresh Guacamole.

The Farolada, named after the Farolito chain of taco restaurants, consists of pita bread stuffed with Mexican Manchego cheese (similar to Monterey Jack), thrown on the grill until the cheese oozes out. If let to sit there per your request, it will become crispy too.

I turned around to start chopping some Serrano chile for the guacamole when Vered said she had another plan for my avocado and her pita: the Israeli way. Which, she said in a challenging fashion, was incredibly tasty.

Now, you can’t just walk into my kitchen and tempt me with something I have never eaten before.

We split that creamy, perfect avocado in half.

She mixed hers with feta cheese, green olives, lime juice (much to her dismay since she never uses limes, but it is very strange to find a lemon in my kitchen) olive oil and salt. She didn’t fill her pita with anything, just heated it up.

While the Farolada was getting nice and crunchy, I prepared my favorite guacamole version: smashed avocado with rivers of lime juice, generous amounts of serrano chile and cilantro and a healthy sprinkling of salt. No chopped tomatoes in there, thank you.

She ate my Mexican version and nodded in approval; I ate her Mediterranean one and loved it. In fact, I think I liked hers more. It seemed more exotic, plus I really enjoy the tangy taste of French feta.

Nonetheless, I finished with a piece of mine, if only because it tasted like home.

Here, you can try them both! See what you think.

Avocados main
Print Recipe
5 from 1 vote

Vered’s Avocado Salad with Toasted Pita Bread

My friend Vered's avocado salad the Israeli way. She mixes the avocado with feta cheese, green olives, lemon juice, olive oil and salt.
Prep Time15 minutes
Cook Time0 minutes
Total Time15 minutes
Course: Appetizer, Snack
Cuisine: Israeli, Mexican
Keyword: Avocado, cheese, Eggs, feta, lemon, olives, pita, Recipe
Servings: 6 servings
Author: Pati Jinich

Ingredients

  • 2 ripe Mexican avocados halved, pitted and peeled
  • 1/2 cup pitted green olives chopped (preferably the cracked bitter ones)
  • 3 scallions chopped
  • 2 to 3 tablespoons fresh lemon juice (she asked me to point out that she meant lemon and never lime)
  • Salt to taste
  • Ground black pepper to taste
  • 2 hard boiled eggs peeled and chopped (optional)
  • 1/2 cup Israeli or French feta cheese crumbled (optional)
  • Hot or toasted pita breads

Instructions

  • In a mixing bowl, mash the avocados with a fork to a chunky paste. Add the olives, scallions, lemon juice, salt and pepper and mix well. Add chopped egg and/or crumbled feta if you are going to use.
  • Spread the avocado salad over toasted pita bread or a slice of bread. For the perfect Israeli dinner – eat with a side of an Israeli salad and scrambled eggs (she pointed out I should add that too…)

Notes

Ensalada de Aguacate con Pita Arabe
avocado
Print Recipe
5 from 1 vote

Pati’s Guacamole Ranchero with Faroladas

The Farolada, named after the Farolito chain of taco restaurants, consists of pita bread stuffed with Mexican Manchego cheese (similar to Monterey Jack), thrown on the grill until the cheese oozes out. If let to sit there per your request, it will become crispy too.
Prep Time15 minutes
Cook Time5 minutes
Total Time20 minutes
Course: Antojos, Appetizer, Main Course, Snack
Cuisine: Mexican
Keyword: Avocado, cheese, Farolada, guacamole, Mexican Manchego, pita, Ranchero, Recipe, serrano chiles
Servings: 4 servings
Author: Pati Jinich

Ingredients

Guacamole:

  • 2 ripe Mexican avocados halved, pitted, peeled and diced
  • 1 tablespoon chopped white onion
  • 1 serrano chile or to taste, minced (seeding is optional and may substitute with jalapeño)
  • 1 tablespoon roughly chopped cilantro leaves
  • 3 tablespoons fresh lime juice
  • 1 teaspoon kosher salt or to taste

Faroladas:

  • 4 whole pita breads
  • 1 cup shredded Mexican Manchego cheese or Monterey Jack

Instructions

To make the guacamole:

  • Gently mix ingredients in a bowl and serve. It can be prepared a couple of hours in advance if covered and stored in the refrigerator.

To make the faroladas:

  • Heat a comal or heavy dry skillet over medium-low heat for about 5 minutes. Gently heat the pita breads over the comal or skillet for about 15 seconds per side. Remove and make a horizontal slice halfway through, making a long and wide pocket.
  • Stuff each pita with about 1/4 cup shredded cheese. Place them back on the hot comal or skillet and heat for about 3 to 4 minutes on each side, to your liking, until cheese is melted and depending how crunchy or soft you want the pita bread. For crunchier, leave longer. Remove from heat, cut into 4 pieces and eat with the guacamole.

Notes

Guacamole Ranchero con Faroladas

Cooked Salsa Verde: Basic Recipe

This is a versatile basic green tomatillo salsa. It can be drizzled on top of Mexican Antojos, such as Tostadas, Tacos, Quesadillas and Sopes. It can also be used to make Green Enchiladas or Chilaquiles. It can be spooned on top of eggs in the morning, used as a side garnish to grilled meats and as the seasoning to bake some fresh flaky fish in the oven. I could go on and on and on! Here it goes:

cooked salsa verde
Print Recipe
4.84 from 6 votes

Cooked Salsa Verde

This is a versatile basic green tomatillo salsa. It can be drizzled on top of Mexican Antojos, such as Tostadas, Tacos, Quesadillas and Sopes… It can also be used to make Green Enchiladas or Chilaquiles. It can be spooned on top of eggs in the morning, used as a side garnish to grilled meats and as the seasoning to bake some fresh flaky fish in the oven. I could go on and on though…. here it goes.
Prep Time5 minutes
Cook Time20 minutes
Course: Sauce
Cuisine: Mexican
Keyword: chile, cilantro, garlic, onion, pati's mexican table, Recipe, Salsa, salsa verde, serrano chiles, tomatillos, Vegetarian
Servings: 2 cups
Author: Pati Jinich

Ingredients

  • 2 pounds green tomatillos husks removed and rinsed
  • 2 garlic cloves peeled
  • 2 serranos chiles or more to taste
  • 1 cup cilantro leaves
  • 1/4 cup white onion roughly chopped
  • 1 teaspoon kosher or sea salt or to taste
  • 2 tablespoons safflower or corn oil

Instructions

  • Place the tomatillos along with the garlic cloves and the chiles serrranos in a pot and cover with water. Place over high heat until it comes to a boil. Simmer at medium for about 10 minutes, or until tomatillos change their color from a bright to a pale green, are cooked through and are soft but are not coming apart.
  • Place tomatillos, garlic and chile (you may add one chile first) and 1/2 cup of the cooking liquid in the blender and puree until smooth. Incorporate the cilantro leaves, onion and salt and process again. Taste for salt and add more if need be. Also taste for heat, you may add the other chile in pieces until you reach your desired heat level.
  • Heat the oil in a pot over medium heat. Once it is hot but not smoking, pour in the sauce and bring it to a boil. Simmer over medium heat for 6 to 7 minutes, until it thickens a bit and deepens its flavor and color. Turn off the heat.
  • Once it cools down, you may store it in a closed container in the refrigerator for weeks. However, the heat level of the sauce will diminish as the days go by.

Notes

Salsa Verde Cocida

Refried Beans

You will find that refried beans are one of the most common sides for traditional Mexican dishes. From breakfast, to dinner, they are always a welcome companion. You can make them with different kinds of beans, like Black, Pinto,  or Peruvian. The choice in Mexico varies among regions but also among cooks. I tend to use the Pintos more, because they have a creamier consistency and softer flavor. The Black, delicious as well, have a stronger flavor and texture. The Peruvian have a peculiar flavor, that is hard to define, but it is stronger than the Pintos and lighter than the Black.

You can make the Refried beans in a traditional way, which is by mashing the Frijoles de Olla in the pan with onion that has been sauteed in lard, or you can substitute for oil. You can also make quicker and smoother Refried beans, by skipping the mashing part, and placing the Frijoles de Olla in the blender, to make a smooth Bean puree that you can then thicken and season.

Aside from a side, Refried beans are used to make many things like Tortas, Molletes, Tacos, Quesadillas and Dips.

Refried beans are absolutely delicious on their own, with corn tortillas and pickled jalapenos.  They also can be turned into many dishes such as charros beans.

Refried Beans 1

You can choose if you want your beans the traditional way, which takes a little bit more effort as you have to mash them as they season and thicken. Or you can opt for an easier and faster way, which doesn’t have that rough textured feel, but it is much smoother.

Print Recipe
4.67 from 6 votes

Smooth and Easy Refried Beans

You will find that refried beans are one of the most common sides for traditional Mexican dishes. From breakfast, to dinner, they are always a welcome companion. You can make them with different kinds of beans, like Black, Pinto,  or Peruvian. The choice in Mexico varies among regions but also among cooks. I tend to use the Pintos more, because they have a creamier consistency and softer flavor. The Black, delicious as well, have a stronger flavor and texture. The Peruvian have a peculiar flavor, that is hard to define, but it is stronger than the Pintos and lighter than the Black.
Prep Time2 minutes
Cook Time15 minutes
Course: Side Dish
Cuisine: Mexican
Keyword: beans, black beans, onion, Peruvian beans, pinto beans, Recipe, refried beans
Servings: 4 cups
Author: Pati Jinich

Ingredients

  • 6 cups basic bean puree
  • 3 tablespoons safflower or corn oil
  • 1/2 cup white onion chopped

Instructions

  • In a large saute pan over medium high heat, pour the oil and heat until hot but not smoking, about 1 to 2 minutes. Add the onions and let them saute for about 3 to 4 minutes, until they have softened, become translucent and have started to slightly brown along the edges.
  • Add the bean puree over the sauteed onion, and let them season and thicken for about 10 to 15 minutes, stirring occasionally. If the beans are bubbling way too much, lower the heat a little to medium-low heat. Let them continue thickening, until they have achieved a thick puree consistency and are somewhat pasty looking. It depends on your liking, some people like them thicker and some people like them with a softer consistency. While it depends on how you like them, they are mostly cooked until they can hold a shape when scooped with a spoon.

Poblano Peppers: How to Prep

Poblano peppers or chiles, are rarely used in their raw form. While some ingredients are ready to jump in your mouth or in the pot, like an apple or a carrot, others have to go through a couple steps to bring out their finest qualities in flavor, color and texture. But those extra steps are so worth it! It can seem hard at first, but once you prepare them a couple of times the process becomes very simple.  Plus you can make more than you need and freeze them for up to 4 or 5 months. Here are the steps.

First, roast or char them
To do so, you can either place them on a tray under the broiler, directly on the grill or directly on the open flame, which is what is typically done in Mexico. I prefer to broil them because you can do many more at one time, and it just seems faster and easier.

Whatever method you choose, turn them every 2 to 3 minutes for a total of 6 to 9 minutes. They must seem charred and blistered on the outside, but the flesh must be cooked though not burnt. Just like roasting marshmallows over a fire.

Second, make them sweat.
Once charred and hot place them in a plastic bag, close it tightly and let them sweat for 10 to 20 minutes.

Third, peel and rinse.
Preferably under a thin stream of cold water, remove the charred skin which should come right off.  Make a slit down one side of the pepper and remove the cluster of seeds and veins.

If being used to stuff, keep them whole with the stem. If being used for rajas, take the stem off and make slices. I like them of about 1/2-inch wide.

If you want your poblanos to be fairly mild, once prepared, let them soak in warm water mixed with a tablespoon of brown sugar for 10 to 30 minutes, then drain.

The New York Times: A Taste of Passover, With a Mexican Accent

“Patricia Jinich teaches regional Mexican cooking at the Mexican Cultural Institute here. But at the Lubavitch Center recently she showed about 70 Jewish women how to cook for Passover.

She made gefilte fish in a Veracruz sauce of tomatoes, pickled peppers, olives and capers, and spoke of how her Polish grandfather loved to wrap fresh, warm tortillas around gribenes (chicken cracklings with fried onions) with a side of guacamole.

Some of the women were in long dresses, with their heads covered. Ms. Jinich, 37, had on a Mexican huipil blouse with red and green trim under her chef’s jacket.

Still, she said, ‘The Yiddische mama and the Mexican mama have lots in common.'”

Click here to read the entire article. Check out the recipe for Mushroom-Jalapeño Matzo Ball Soup.

Avocados

The smooth, soothing, creamy qualities of Mexican avocados are the perfect combination to the richly flavored and sometimes spicy Mexican food. My favorite avocados are the Hass variety and for some reason, I like the Mexican ones the most! They tend to be larger, meatier, creamier and just more luxurious than others.

Though many people think of avocados as vegetables, they are fruits.

Since they are harvested green (mature but not yet ripened), in some stores you may find them when they are not ready to eat. If the skin still looks green and the avocado feels firm to the touch, they probably need 3 to 6 days of ripening. You can bring them home and place them in a paper bag or newspaper in a warm area of your kitchen to speed up the ripening process. You can also just leave them outside of the refrigerator. They are ripe and ready to eat when the skin is almost completely black and the avocado gives in a bit if you gently squeeze it. Once ripe, you can keep them in the refrigerator for up to a week if not opened and about one or two days if opened and covered with plastic wrap.

Ancho Chile

The Ancho chile is a stellar ingredient in Mexican cuisine. It is probably the most used dried Chile throughout Mexico and no wonder why: its flavor is unmatchable.

The Ancho is the Poblano Chile that has been ripened to a deep red and then dried. This concentrates the already exuberant and fruity flavors of the Poblanos.

It is wide, chubby, wrinkled and very pliable, different from other dried chiles. It has a deep reddish brown skin, with a bit of shine, which sort of imitates its flavor as well. Deep and rich, sharp and fruity, it has a hint of bittersweet notes and a resemblance to the flavor of prunes. It is very mild in heat.

Ancho chiles can be easily found in grocery stores throughout the US. They are typically rinsed, seeded and then toasted and/or soaked or simmered in hot water before using them to make delicious salsas, scrumptious moles or luscious soups.

Tex Mex or Mex Tex: Take Two

Talking about American foods enriched by Mexican ingredients, I can’t leave out those tasty, juicy and smoky Ancho Chile hamburgers. My mother used to make them for our birthday parties as me and my sisters grew into teenagers. We felt more hip having funky burgers instead of kid sized tacos. Plus, they were a hit with our friends.

They are a snap to make and for the Mexican spin you just need to prepare a seasoning paste with Ancho Chiles.  Anchos, being ultra mild and somewhat fruity with a hint of prunes, make an instant click with the meat.

My mother used to mix half veal and half beef, when making hamburgers, meatloaf or meatballs. It works out well, but it is not necessary. She used to serve these hamburgers with the traditional American trimmings: sliced onions, tomatoes, fresh lettuce, ketchup and mustard.

But when I was reminiscing with my friend Andrea about these Mexicanized American dishes, she suggested we try a citrusy mayo spread. What a surprise! That tangy spread makes these tasty hamburgers bounce off the walls out of happiness.

I wouldn’t dare call this hamburger traditional Mexican food, although the recipe has been in my family for more than four decades. When you think about it, once an ingredient or a dish of a country enters another country and becomes accepted, it gains a life of its own.

I don’t think there ever is a right or wrong take in the kitchen (Diana Kennedy may just be aiming at me with a rifle now). It seems to me that it is all fair game as long as you get to know your ingredients and how to use them. And of course, there has to be a worthwhile and delicious result.

Print Recipe
4.50 from 2 votes

Ancho Chile Mexican Hamburgers with Lime Aioli

Talking about American foods enriched by Mexican ingredients, I can’t leave out those tasty, juicy and smoky Ancho Chile hamburgers. My mother used to make them for our birthday parties as me and my sisters grew into teenagers. We felt more hip having funky burgers instead of kid sized tacos. Plus, they were a hit with our friends. They are a snap to make and for the Mexican spin you just need to prepare a seasoning paste with Ancho Chiles.  Anchos, being ultra mild and somewhat fruity with a hint of prunes, make an instant click with the meat.
Prep Time15 minutes
Cook Time8 minutes
Course: Main Course
Cuisine: Mexican
Keyword: ancho chiles, beef, chile, hamburger, lime, lime aioli, mayonnaise, Recipe, veal
Servings: 8 burgers
Author: Pati Jinich

Ingredients

For the burgers:

  • 1 1/2 pounds ground beef
  • 1 1/2 pounds ground veal
  • 1 1/2 cup white onion roughly chopped
  • 3 cloves garlic
  • 4 ancho chiles rinsed, seeded and soaked (explanation follows)
  • 1 1/2 teaspoons kosher or sea salt or to taste
  • 1/2 teaspoon black pepper freshly ground, or to taste
  • 2 eggs lightly beaten
  • safflower or corn oil

For the lime aioli:

  • 1 cup mayonnaise
  • Juice of 1 lime about 2 tablespoons
  • 1 teaspoon grate lime rind
  • 3 garlic cloves pressed
  • 1 teaspoon kosher or sea salt
  • 1/4 teaspoon black pepper

For the garnishes:

  • 8 hamburger buns
  • yellow mustard
  • ketchup
  • 2 red tomatoes sliced
  • 8 iceberg or romaine lettuce leaves rinsed and dried
  • 1/2 white onion sliced

Instructions

  • Rinse the ancho chiles. On a chopping board, make a slit down their side and take out all of their seeds, veins and stems. Place the cleaned chiles in a small bowl and cover with 1/2 cup boiling hot water. Let it soak for 10 to 15 minutes. Places chiles in the blender along with the soaking liquid, onion and garlic, and puree until smooth.
  • In a mixing bowl, combine the ground beef and veal. Add the chile mixture, two lightly beaten eggs, salt and pepper. Mix until it is all well incorporated.
  • Heat the griddle or pan over medium heat until very hot, about 6 to 8 minutes. Brush some oil on the griddle or pan.
  • With your hands, mold the patties and place them on the hot griddle or pan. Cook for about 4 to 6 minutes per side, depending on how well cooked you like your burgers. I like them medium-well, so it is about 5 minutes per side for me.
  • Place the garnishes on the table so that everyone can choose to their liking.
  • To make the lime aioli, place everything in a mixing bowl, and just mix it all up!
  • If you want to make this hamburger into a cheeseburger, Monterey jack is a great companion. Just place a slice of cheese on to the burger once you flipped it and let it melt as it finishes cooking.

Notes

Hamburguesas con Chile Ancho y Aioli de Limon

Tex Mex or Mex Tex

“Can you think of an American dish that has been Mexicanized?” My friend Andrea asked. “It has gone the other way around, no?” I responded, thinking about Tex Mex and the complaints from Mexican food aficionados about Mexican food being Americanized in the US.

But the other way around? As I swam through my childhood memories in Mexico City I was startled by how wrong my natural response had been. Of course there are Mexicanized American foods, and plenty!

Where to start? How about those incredible hot dogs my three older sisters and I used to eat at El Galan (translates to the hunk) hot dog stand. We got into so much trouble with my father because of them. As soon as my oldest sister could drive, we stopped on our way back from school to eat one, and why not two, and why not three hot dogs con todo, with all the trimmings.

We were so full by the time we sat down in front of those homemade meals my mother had planned for us, that we could barely fit a bite into our mouths. My father angrily gave us a weekly hot dog allowance and asked my mother not to cook for a couple weeks.

The scheme didn’t work.

We compromised.

We would only eat them on Fridays.

These hot dogs were soooo Mexican. El Galan, drizzled some oil on his hot plancha or griddle. He then threw in some chopped white onions, pickled jalapenos, and tomatoes. Then, as they sizzled, he would squirt some ketchup (with some secret ingredient we still can’t figure out) and yellow mustard and mix it all up.

He threw a slice of cheddar to crown that delicious mess, he let it melt, and then shoved it into a soft hot dog bun. A steaming hot sausage then sat on top. If that wasn’t enough, if you said you wanted your hot dog especial, or special, a couple of crispy bacon slices found their way into that party.

Right now, I would give up all that is in my refrigerator to have one of those.