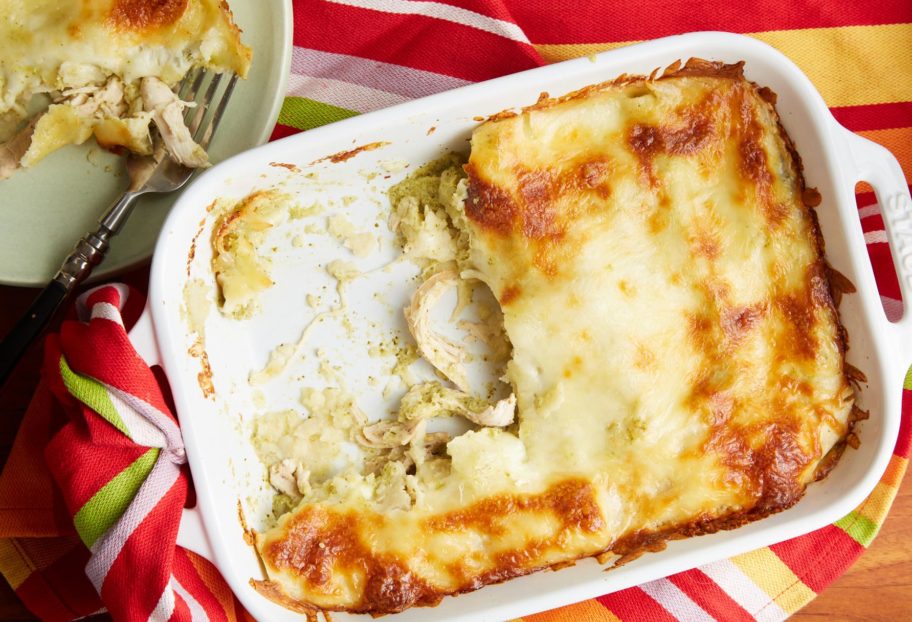
Chipotle Butternut Squash Risotto

Chipotle Butternut Squash Risotto
Print Recipe
4.84 from 6 votes

Chipotle Butternut Squash Risotto

Chipotle Butternut Squash Risotto, from Pati’s Mexican Table Season 7, Episode 10 "Los Cabos by Land & Sea"
Prep Time15 minutes
Cook Time55 minutes
Total Time1 hour 10 minutes
Course: Main Course
Cuisine: Mexican
Keyword: butternut squash, pati's mexican table, Recipe, rice, risotto, Vegetarian
Servings: 6 Servings
Author: Pati Jinich

Ingredients

  • 1 butternut squash (2 to 3 pounds) peeled seeded, cut into 1/4” dice
  • 1/4 cup olive oil plus 3 tablespoons
  • 1 teaspoon chipotle chile powder
  • 2 teaspoons kosher or sea salt divided, or to taste
  • 6 to 7 cups chicken broth
  • 1 cup requesón or mascarpone cheese
  • 1 to 2 tablespoons sauce from chipotles in adobo
  • 1 tablespoon maple syrup
  • 1 1/2 cup finely chopped leeks
  • 1 1/2 cup finely chopped white onion
  • 1/2 cup water
  • 2 cups Arborio rice
  • 1 cup white wine
  • 2 tablespoons unsalted butter
  • 1/2 cup grated Cotija cheese
  • 1/4 cup chopped fresh epazote leaves
  • 1/4 cup chopped fresh cilantro leaves

Instructions

  • Set a rack in upper third part of the oven and preheat to 400 degrees Fahrenheit.
  • Place the butternut squash on baking sheet, drizzle 3 tablespoons of olive oil, sprinkle with the chipotle chile powder and 1 teaspoon of the salt and toss. Place in the oven and roast for 20 to 25 minutes, until cooked and very soft. Scrape onto a bowl and set aside.
  • Pour the chicken broth into a saucepan set over medium-low heat. Bring to a simmer, then reduce heat to low.
  • While your both comes to a simmer, combine the requeson or mascarpone cheese with the sauce from chipotles in adobo and the maple syrup in a small bowl. Season with salt to taste and set aside.
  • Before moving on, be ready with your roasted butternut squash and chicken broth that should be at a low simmer, if need be, raise heat to medium.
  • Heat ¼ cup olive oil in an extended casserole or Dutch oven set over medium heat. Once hot, add the leeks, onion and ½ teaspoon of the salt, and cook for 8 to 10 minutes, stirring often, until softened and wilted. Pour in the water and continue to cook and stir until the water has completely evaporated, the vegetables have become even softer, and they begin to glisten with the oil.
  • Incorporate the rice and stir well to combine with the vegetables and coat in the oil. Add the remaining ½ teaspoon salt, stir, and cook 3 to 4 minutes. The rice should start to smell toasty, but it shouldn’t brown.
  • Pour in the wine, stir, and cook 2 to 3 minutes more until it completely evaporates, then immediately add a large ladleful of the simmering broth. Cook at a simmer until it is absorbed and you can see the bottom of the casserole when you stir.
  • Add the next ladle of broth, along with about a fourth of the roasted butternut squash, simmer and cook until the liquid is absorbed again. Repeat 3 more times, adding another ladle of broth and a fourth of the squash each time, until all the squash has been added.
  • Continue adding broth by the ladleful until the risotto is cooked al dente. Add a cup more broth and stir before you turn it off; it should be quite soupy, yet the broth should be thick.
  • You may have used only 6 cups of the broth or all 7 cups, depending on the heat of your stovetop and the weather where you live. What matters is the rice is still al dente and the consistency still seems a bit soupy.
  • Turn off the heat, top with the butter and the seasoned requeson or mascarpone cheese. Stir well to mix. Sprinkle on the grated cotija and the epazote and cilantro and serve.

Notes

Risotto de Calabaza al Chipotle

Almond, Guajillo and Garlic Flounder

Almond, Guajillo and Garlic Flounder
Print Recipe
4.25 from 4 votes

Almond, Guajillo and Garlic Flounder

Almond, Guajillo and Garlic Flounder, from Pati’s Mexican Table Season 7, Episode 10 "Los Cabos by Land & Sea"
Prep Time10 minutes
Cook Time5 minutes
Total Time15 minutes
Course: Main Course
Cuisine: Mexican
Keyword: almond, fish, flounder, Guajillo, pati's mexican table, Recipe, seafood, sole
Servings: 4 Servings
Author: Pati Jinich

Ingredients

  • 1 pound flounder or sole fish fillets
  • 1/2 teaspoon kosher or sea salt
  • Freshly Ground black pepper to taste
  • 3 tablespoons unsalted butter divided
  • 3 tablespoons vegetable oil divided
  • 15 garlic cloves peeled and sliced
  • 2 chiles guajillo stemmed, seeded, thinly sliced
  • 1/3 cup slivered almonds
  • 2 limes halved

Instructions

  • Season the fish fillets with the salt and pepper.
  • Heat 2 tablespoons of the butter and 2 tablespoons of the oil in a large nonstick skillet set over medium-high heat. Once the butter melts and bubbles, add the fish fillets in a single layer, without overcrowding the pan (you can also cook them in two batches).
  • Sear for 1 to 2 minutes per side. Before flipping, run a metal spatula under the fish to make sure there is a layer of butter and oil beneath the fish to make it easier to turn. Flip and cook for 1 or 2 minutes on the other side, until the fish is cooked though and can be flaked with a fork.
  • Place the cooked fish on a serving platter.
  • Add the remaining 1 tablespoon butter and 1 tablespoon oil to skillet, scrape the bottom of the pan well. Add the garlic and chiles guajillo, stir, and cook for half a minute before adding the slivered almonds. Stir as it all browns and crisps, no more than a minute. Scrape over the fish. Serve with halved limes and insist that your guests squeeze lime juice over the fish before they eat it.

Notes

Pescado al Ajillo con Almendras y Guajillo 

Chocolate Custards

Jericalla Chocolate Custards
Print Recipe
3.58 from 7 votes

Chocolate Custards

Chocolate Custards, from Pati’s Mexican Table Season 7, Episode 10 "Los Cabos by Land & Sea"
Cook Time1 hour
Total Time1 hour
Course: Dessert
Cuisine: Mexican
Keyword: Chocolate, custard, Dessert, Jericalla, pati's mexican table
Servings: 10 Custards
Author: Pati Jinich

Ingredients

  • 5 cups whole milk
  • 1 tablespoon vanilla extract
  • 1 2- inch stick ceylon cinnamon or canela
  • 8 ounces semi-sweet chocolate broken or cut into small (1/4-inch) pieces
  • 9 egg yolks
  • 1 cup granulated sugar
  • Pinch of fine sea salt
  • 1 batch Blackberry, Mint and Lime Coulis (optional)

Instructions

  • Place the milk, vanilla extract and cinnamon stick in a medium saucepan and bring to barely a simmer over medium heat. Once it begins to bubble and simmer around the edges, reduce the heat to the lowest possible setting and simmer for 5 more minutes. Remove from the heat and set aside to cool. Once cool, remove the cinnamon stick.
  • Preheat the oven to 350 degrees Fahrenheit.
  • Place the chocolate in the top part of a double boiler, or in a metal bowl set over a saucepan filled with 1 inch of water. Make sure that the bottom of the bowl is not touching the water. Bring the water to a simmer and melt the chocolate. Stir with a rubber spatula to make sure all of the chocolate is evenly melted.
  • In a medium bowl, using a whisk or fork, combine the egg yolks, sugar, and salt and whisk or beat until thickened and the color has gone from bright to pale yellow, about 1 minute (or count 60 Mississippi’s at your own leisure). Slowly whisk in the melted chocolate and combine thoroughly. A ladleful at a time, whisk in the cooled milk.
  • Fill a baking dish or roasting pan, large enough to accommodate ten 6-ounce ramekins or flan or custard molds, with ½-inch of hot water. Place the molds in the water bath. Using a ladle, carefully fill the molds with the custard up to about ¼-inch below the rims.
  • Carefully place the baking dish in the oven and bake for 40 minutes, or until the custard has begun to set. The top layer should be thick and resemble the top of a brownie. It should not be browned, although there can be a few small spots here and there.
  • Very carefully remove the pan from the oven and the ramekins from the water bath. The jericalla will jiggle and will look a bit runny under the thickened tops, like a thin pudding. They will thicken as they cool.
  • Serve at room temperature, or once cool, chill in the refrigerator and serve cold. Serve with Blackberry, Mint and Lime Coulis if you desire.
  • Variation: Some Mexican cooks brown or caramelize the top layer of their jericallas by briefly running them under a broiler (I prefer a top layer that thickens as it bakes but doesn’t brown). If you want the darker caramelized topping, place the custards under the broiler for 30 seconds after they have cooled.

Notes

Jericalla de Chocolate

Blackberry, Mint and Lime Coulis

Blackberry, Mint and Lime Coulis
Print Recipe
4.34 from 6 votes

Blackberry, Mint and Lime Coulis

Blackberry, Mint and Lime Coulis, from Pati’s Mexican Table Season 7, Episode 10 "Los Cabos by Land & Sea"
Cook Time5 minutes
Course: Dessert
Cuisine: Mexican
Keyword: blackberry, coulis, Dessert, lime, mint, pati's mexican table, sauce
Servings: 1 cup, approximately
Author: Pati Jinich

Ingredients

  • 2 cups blackberries, rinsed and drained
  • 2 tablespoons granulated sugar or to taste
  • 2 tablespoons (about 16 large leaves) coarsely chopped mint leaves plus more for garnish
  • 1 teaspoon freshly squeezed lime juice or to taste

Instructions

  • Place the blackberries, sugar, and mint in a blender and puree until smooth. Pass the mixture through a fine strainer set over a bowl. Stir in the lime juice. Cover and refrigerate until ready to use.

Notes

Salsita de Zarzamora con Menta y Limón

Dulce de Leche Mousse

Dulce de Leche Caramel Mousse
Print Recipe
4.43 from 7 votes

Dulce de Leche Mousse

Dulce de Leche Mousse from Pati’s Mexican Table Season 7, Episode 11 "New York"
Prep Time10 minutes
Cook Time2 hours
Total Time2 hours 10 minutes
Course: Dessert
Cuisine: Mexican
Keyword: Cajeta, Dessert, Dulce de Leche, mousse, pati's mexican table, Recipe
Servings: 6 Servings
Author: Pati Jinich

Ingredients

  • 1/3 cup water
  • 1 envelope or about 1 tablespoon, unflavored gelatin granules
  • 1/2 cup whole milk
  • 1 cup Dulce de Leche or Cajeta
  • 1 cup heavy whipping cream
  • 1 cup diced fresh strawberries or berries of your choice optional for garnish

Instructions

  • Pour the water into a medium heatproof bowl and add unflavored gelatin. Stir and let it sit until the mixture puffs up, about 2 minutes. Fill a small saucepan, that can hold the heatproof bowl, with a couple inches of water and bring to a simmer. Place the bowl with gelatin on top, stirring occasionally, until gelatin completely dissolves, about 2 minutes. Remove from heat.
  • Add the milk and Dulce de Leche to a small saucepan set over medium heat. Stir until fully combined, about 1 to 2 minutes.
  • Pour the mixture into the bowl with the diluted gelatin and mix well. Set the bowl over an ice bath and let mixture cool and begin to set.
  • In a stand mixer, fitted with the whisk attachment, beat the heavy whipping cream until it holds soft peaks. Be careful not to overbeat.
  • Gently fold the cooled dulce de leche caramel mixture into the whipped cream until fully combined. Don’t overmix, so you won’t lose much volume. Pour the mixture into a 6 cup ring mold, bundt pan, or 6 individual ramekins (of 6 to 7 ounces). Cover with plastic wrap and chill for at least 2 to 3 hours before serving.
  • When ready to serve, remove mousse from refrigerator. If using a mold or bundt pan, invert the mousse onto a platter. Top with berries, if desired, or chocolate salami.

Notes

Mousse de Dulce de Leche

Chocolate Salami

Chocolate Salami
Print Recipe
4.67 from 9 votes

Chocolate Salami

Chocolate Salami from Pati's Mexican Table, Season 7, Episode 11 "New York"
Cook Time10 minutes
Course: Dessert
Cuisine: Mexican
Keyword: Chocolate, James Beard House, Maria Cookies, pati's mexican table
Servings: 2 logs (serves 6 to 8 people)
Author: Pati Jinich

Ingredients

  • 8 ounces (or 225 grams) bittersweet chocolate
  • 1 tablespoon unsweetened cocoa powder
  • 3/4 cup unsalted butter
  • 2/3 cup granulated sugar
  • 1/2 teaspoon vanilla extract
  • 5 egg yolks
  • 12 ounces Maria Cookies broken into small pieces
  • 1/2 cup pecans lightly toasted and coarsely chopped optional
  • confectioners' sugar optional

Instructions

  • In a double boiler set over simmering water, melt the chocolate and cocoa powder along with the butter. Remove from the heat, stir, and transfer the mix to a large heatproof bowl. Add the sugar and vanilla and combine with a spatula in a circular motion. Slowly add the egg yolks, one by one, mixing very well after each addition. Fold in the broken cookie chunks. If adding pecans, fold them all in as well. You will have a moist and chunky, rough looking mix.
  • Cut 2 pieces of waxed or parchment paper of about 15" length. Spoon half of the mixture onto each piece of paper. Shape them into logs with your hands and roll them in the paper to give them a salami shape of about 2" thickness. Having the paper cover makes it easy to give them a quick roll to give them a round shape. To finish, twist the ends of the paper in opposite directions.
  • Wrap each one in a layer of plastic wrap. Place them in the freezer for about 2 or 3 hours or until frozen.
  • If you wish, roll each log in confectioners’ sugar before slicing to make the slices resemble salami. Slice them as thin or thick as you like, while frozen, and serve.
  • Chocolate salami will keep in the freezer, tightly wrapped, for about 6 months. Remove from the freezer about 10 minutes before you want to slice it.
  • If you want to give them as gifts, you may want to buy colored paper to give them a festive feel. Though, I also like to use brown unbleached parchment paper - it gives them a deli style. In any case, if you traveled with them for a while, don't forget to tell your friends to place the chocolate salamis in the freezer or refrigerator as soon as you give it to them(!).

Notes

Salami de Chocolate

Tarascan Pinto Bean and Tomato Soup

tarascan soup
Print Recipe
4.45 from 9 votes

Tarascan Pinto Bean and Tomato Soup

Tarascan Soup Pinto Bean and Tomato Soup, from Pati’s Mexican Table Season 7, Episode 12 "Photographic Food Memories"
Prep Time5 minutes
Cook Time30 minutes
Total Time35 minutes
Course: Soup
Cuisine: Mexican
Keyword: beans, pati's mexican table, pinto beans, Recipe, soup, Vegetarian
Servings: 6 to 8 Servings
Author: Pati Jinich

Ingredients

For soup:

  • 1 pound ripe plum or roma tomatoes
  • 1 clove garlic
  • 1 (about 1 ounce) ancho chile, stem and seeds removed
  • 1/2 cup white onion, coarsely chopped
  • 1 1/2 teaspoons kosher or sea salt divided, or more to taste
  • 3 tablespoons safflower or corn oil
  • 1 pound cooked pinto beans plus 2 cups of their cooking liquid or 2 14-ounce cans cooked pinto beans plus 2 cups water
  • 3 cups chicken broth vegetable broth or water

For garnishes:

  • 1/2 cup Mexican style cream
  • 1 cup crumbled Cotija cheese
  • 1 1/2 cups crumbled tortilla chips or tortilla strips
  • 1 ancho chile stemmed, seeded, diced, deep fried for a few seconds
  • 1 avocado, peeled seeded, meat scooped out and diced, optional

Instructions

  • Place the tomatoes, garlic, and ancho chile in a saucepan. Cover with water, and simmer over medium-high heat for 10 to 12 minutes, until the tomatoes are completely cooked through and ancho chile is rehydrated.
  • Transfer the tomatoes, garlic, and ancho chile to a blender or food processor, along with 1 cup of the cooking liquid, the white onion, and 1 teaspoon of the salt. Puree until smooth.
  • Heat the oil in a large soup pot over medium-high heat. Add the pureed tomato mixture and cook for 6 to 8 minutes, stirring occasionally, until it darkens in color and thickens in consistency.
  • Meanwhile, rinse your blender or food processor, then add the pinto beans and 2 cups of their cooking liquid (or water, if using canned beans) and puree until smooth.
  • Reduce the heat to medium and stir the bean puree, broth and the remaining ½ teaspoon of salt into the thickened tomato mixture. Simmer for 10 to 15 minutes, or until the soup has seasoned and has a creamy consistency. Taste for salt and add more if needed. Turn off the heat, as it thickens quickly.
  • Ladle the soup into bowls, drizzle with a tablespoon of the cream and top with some cheese, a handful of crumbled tortilla chips or tortilla strips, a few fried ancho chile crisps and some diced avocado. You can also place the garnishes in bowls on the table to let your guests decide how much of each garnish they want to add to their bowls.
  • The soup itself may be cooled and stored in a tightly sealed container in the refrigerator for up to 4 days. Because this soup thickens a bit as it cools, you may need to add some chicken broth or water to thin it out when you reheat it.

Notes

Sopa Tarasca

Sanborns’ Swiss Chicken Enchiladas

Sanborns’ Swiss Chicken Enchiladas
Print Recipe
4.30 from 10 votes

Sanborns’ Swiss Chicken Enchiladas

Sanborns’ Swiss Chicken Enchiladas, from Pati’s Mexican Table Season 7, Episode 12 "Photographic Food Memories"
Prep Time30 minutes
Cook Time15 minutes
Total Time45 minutes
Course: Main Course
Cuisine: Mexican
Keyword: chicken, corn tortillas, Enchilada, Oaxaca cheese, pati's mexican table, Recipe, serrano chiles, tomatillos
Servings: 6 Servings
Author: Pati Jinich

Ingredients

  • 1 1/2 pounds tomatillos husked, scrubbed and rinsed, and quartered
  • 2 garlic cloves peeled
  • 1/2 cup coarsely chopped white onion
  • 1 to 2 serrano chiles stemmed, seeding optional
  • 1 1/2 cups coarsely chopped cilantro leaves and upper part of stems
  • 1 teaspoon kosher or sea salt or to taste
  • 1/4 cup water
  • 1 tablespoon canola or safflower oil
  • 1 cup chicken broth, or vegetable broth, or water homemade or store-bought
  • 1 cup Mexican style cream, Latin-style cream or heavy cream
  • 12 Corn tortillas
  • 3 cups shredded cooked chicken
  • 3 cups Oaxaca or Muenster cheese, grated

Instructions

  • In a blender, combine the tomatillos, garlic, onion, chiles (start with 1 and add another if desired), cilantro, salt and water. Puree until completely smooth.
  • Heat the oil in a medium saucepan set over medium heat until hot but not smoking. Add the pureed tomatillo mixture, being careful as it will sear and splutter. Cover partially with a lid and cook, stirring occasionally, until it thickens and darkens, about 4 to 5 minutes.
  • Stir in the broth, cover partially, and simmer for 5 minutes more. Turn off the heat and stir in the cream. Set aside.
  • Prepare the tortillas for enchiladas by either heating them on a comal or passing them through hot oil.
  • Preheat the oven to 400 degrees Fahrenheit.
  • Pour about 1 cup of the cooked salsa verde into a 9”x13” baking dish. One by one, place a tortilla on a plate or cutting board and arrange about ¼ cup shredded cooked chicken down the middle. Roll up into a soft chubby enchilada and place seam down in the baking dish. Continue with the rest of the tortillas.
  • Pour the remaining cooked salsa verde over the enchiladas and sprinkle the grated cheese on top. Place in the oven and bake for 10 to 15 minutes, or until the cheese has completely melted and begun to lightly brown.

Notes

Enchiladas de Pollo Suizas Sanborns

Tita Chelo’s Frosted Flake Cookies

Tita Chelo’s Frosted Flake Cookies
Print Recipe
4.24 from 13 votes

Tita Chelo’s Frosted Flake Cookies

Tita Chelo’s Frosted Flake Cookies, from Pati’s Mexican Table Season 7, Episode 12 "Photographic Food Memories"
Prep Time15 minutes
Cook Time25 minutes
Total Time40 minutes
Course: Dessert
Cuisine: Mexican
Keyword: cereal, cookies, Dessert, frosted flakes, pati's mexican table, Recipe
Servings: 20 Cookies
Author: Pati Jinich

Ingredients

  • 1 1/3 cups unsalted butter at room temperature
  • 1 1/4 cups granulated sugar
  • 3 eggs at room temperature, cracked into a small bowl
  • 1 tablespoon vanilla extract
  • 1/8 teaspoon fine sea salt
  • 3 cups all-purpose flour plus an additional 1/4 cup for shaping the dough
  • 4 to 5 cups frosted flakes cereal of your choice

Instructions

  • In a stand mixer, fitted with the paddle attachment, whip the butter until soft and fluffy, about 2 minutes. Add the sugar 1/4 cup at a time, beating well after each addition.
  • Scrape down the sides of the bowl and the beaters. Add the eggs and continue beating until well mixed, another minute. Beat in the vanilla and salt. Add the flour 1/4 cup at a time, beating for a few seconds after each addition, and continue to beat until the flour is incorporated. The batter should be very smooth, homogenous and soft. Remove the bowl from the mixer.
  • Cover 2 large baking sheets with parchment paper. Preheat the oven to 325 degrees Fahrenheit and position the oven racks in the middle and bottom thirds.
  • Place 2 cups of frosted flakes on a large dinner plate or baking sheet and using your hands, squeeze and crumble the flakes to make them smaller, taking care not to grind them up completely. Place 1/4 cup flour on another plate and set it next to the plate with the frosted flakes, and have the parchment-covered baking sheets nearby.
  • Dust your hands with the flour on the plate and scoop up about 1/4 cup of dough. Roll it into a ball and flatten the ball slightly in your hands, then put it into the crumbled frosted flakes to “bread” the cookie. Gently press the ball of dough into the flakes as you add about a teaspoon of crumbs to the top, then press into a ¼-inch thick, 3- to 4-inch round. Transfer to the baking sheet and repeat with rest of the dough.
  • Bake 20 to 25 minutes, rotating the pans from top to bottom and front to back halfway through, until the cookies are light golden brown around the edges. Remove from the oven and allow to cool. Store in a tin or a jar.

Notes

Galletas de Zucaritas de la Tita Chelo 

Mary-Mex Crab Dip

Mary-Mex Crab Dip
Print Recipe
4.60 from 5 votes

Mary-Mex Crab Dip

Mary-Mex Crab Dip, from Pati’s Mexican Table Season 7, Episode 13 "Mex’d Up American Regional Favorites"
Prep Time5 minutes
Cook Time35 minutes
Total Time40 minutes
Course: Appetizer, Snack
Cuisine: American, Mexican
Keyword: Antojo, chiles toreados, cotija cheese, crab, dip, Recipe, seafood
Servings: 6 Servings
Author: Pati Jinich

Ingredients

  • 1/4 cup Mexican crema
  • 1/4 cup mayonnaise
  • 1/2 cup crumbled Cotija cheese divided
  • 1/2 cup shredded Muenster cheese
  • 2 tablespoons freshly squeezed lime juice
  • 1 teaspoon Worcestershire sauce
  • 1 teaspoon cayenne pepper
  • 3 tablespoons chiles toreados chopped and drained
  • 1 pound jumbo lump crab meat picked through to remove any shells
  • 4 scallions, thinly sliced
  • Crackers, crostini, or chips for serving

Instructions

  • Preheat the oven to 350 degrees Fahrenheit.
  • In a medium bowl, stir together the crema, mayonnaise, ¼ cup of Cotija cheese, Muenster cheese, lime juice, Worcestershire and cayenne until combined.
  • Fold in the chiles, crab meat, and the white and light green parts of the scallions (reserve the rest for garnish), being careful not to break the crab up too much.
  • Transfer the mixture to an oven safe dish. Sprinkle remaining Cotija cheese on the top. Bake for 30 to 35 minutes, or until it is bubbly and golden brown. Sprinkle on the reserved scallions. Serve with crostini, crackers or chips.

Notes

Dip de Cangrejo Mary-Mex

Spicy Mexican Southern Fried Chicken

Spicy Mexican Southern Fried Chicken
Print Recipe
4.12 from 9 votes

Spicy Mexican Southern Fried Chicken

Spicy Mexican Southern Fried Chicken, from Pati’s Mexican Table Season 7, Episode 13 "Mex’d Up American Regional Favorites"
Prep Time4 hours 10 minutes
Cook Time20 minutes
Total Time4 hours 30 minutes
Course: Main Course
Cuisine: American, Mexican
Keyword: chicken, chiles de arbol, fried chicken, Guajillo, habanero, honey, pati's mexican table, Recipe
Servings: 4 to 5 Servings
Author: Pati Jinich

Ingredients

  • 4 chiles de arbol, stemmed
  • 4 guajillo chiles, stemmed and seeded
  • 1 3-4 pound chicken cut into 10 pieces
  • 3 cups buttermilk
  • 1/2 cup sauce from chipotles in adobo
  • Vegetable oil for frying
  • 3 cups all-purpose flour
  • 1 teaspoon paprika
  • 2 teaspoons kosher or sea salt plus more to season the chicken
  • 1/2 teaspoon pepper plus more to season the chicken
  • 1/2 cup honey
  • 1/4 cup canned sliced habanero chiles

Instructions

  • Heat a comal or cast iron skillet over medium high. Toast the chile de arbol and the guajillo until both sides are slightly charred. Remove from heat and let cool. Once the chiles have cooled, add them to a spice or coffee grinder and finely grind.
  • Add chicken pieces to a large bowl. Season with salt and pepper and 1 tablespoon of the ground chile mixture (reserve the rest). Pour the buttermilk and sauce from chipotles in adobo over the chicken and mix gently to combine. Cover the bowl with plastic wrap and refrigerate for at least 4 hours or up to 48 hours. The longer the chicken marinates, the more the flavors will soak in.
  • When you are ready to cook the chicken, fill a dutch oven or heavy bottomed pan a little less than halfway full with oil and preheat until the temperature reaches 365 degrees Fahrenheit on a fry thermometer (or test the oil by dropping in a small piece of chicken, it should actively bubble around it).
  • Preheat the oven to 350 degrees Fahrenheit and prepare a baking sheet with a rack.
  • Add the remaining chile mixture to a large bowl, along with the flour, paprika, salt and pepper, and whisk to combine. Remove the chicken one piece at a time from the buttermilk - shaking off any excess buttermilk - and put it into the bowl with the flour mix, rotating it to coat.
  • Once all the chicken is in the bowl and fully coated with the flour mix, one at a time, place 2 to 3 pieces into the hot oil, depending on the size of your pan. Be careful not to overcrowd the pan. Fry for 3 to 4 minutes, then flip and fry for 3 more minutes, or until it is a dark golden brown. Transfer to the sheet pan with a rack and place into the oven. Let the oil return to 365 degrees Fahrenheit and repeat the process with remaining chicken pieces.
  • Use a meat thermometer to check the internal temperature of the chicken. They should all be at least 165 degrees Fahrenheit. If the chicken is not fully cooked, leave it in the oven for another 10 to 15 minutes, flipping halfway through.
  • When chicken is ready to serve, heat the honey in a saucepan or in the microwave. Add habaneros with a little of their liquid and stir together. Place the fried chicken on a serving platter and drizzle the habanero honey over the chicken. Serve immediately with extra habanero honey sauce on the side.

Notes

Pollo Empanizado Mexa

Dulce de Leche Chocolate Pecan Pie

Dulce de Leche Caramel Chocolate Pecan Pie
Print Recipe
4.13 from 8 votes

Dulce de Leche Chocolate Pecan Pie

Dulce de Leche Chocolate Pecan Pie, from Pati’s Mexican Table Season 7, Episode 13 "Mex’d Up American Regional Favorites"
Cook Time55 minutes
Total Time1 hour
Course: Dessert
Cuisine: American, Mexican
Keyword: Cajeta, Caramel, Chocolate, cinnamon, Dessert, Dulce de Leche, Pecan, Pie, Recipe
Servings: 10 Servings
Author: Pati Jinich

Ingredients

For the crust:

  • 1 and 1/4 cups all-purpose flour plus more to work the dough
  • Pinch of kosher or sea salt
  • 1 teaspoon granulated sugar
  • 1 stick (or 1/2 cup) cold unsalted butter diced
  • 1/4 cup cold water

For the filling:

  • 3 eggs
  • 1 cup Dulce de Leche or Cajeta
  • 1/2 cup dark brown sugar
  • 1/2 cup light corn syrup
  • 4 tablespoons unsalted butter, melted
  • 1/2 teaspoon kosher or sea salt
  • 2 cups (or 8 ounces) pecan halves coarsely chopped
  • 2 ounces (or 1/3 cup) chopped bittersweet chocolate

Instructions

To prepare the crust:

  • Place the flour, salt, sugar and diced cold butter in a food processor. Process a few times, until the mixture looks like a coarse meal. Add the cold water and process again a few times. The dough should become more moist. Turn out of the food processor and gather into a ball. Lightly dust your countertop with flour, and knead the dough 3 to 4 times until it comes together. Shape into a flat ball, wrap in plastic wrap and refrigerate until firm, about an hour.

To prepare the filling:

  • In a bowl, beat the eggs with a whisk until foamy. Incorporate the Dulce de Leche, brown sugar, corn syrup, melted butter and salt and whisk until it is well blended. Add the chopped pecans and chocolate and mix well.

To assemble the pie:

  • Set an oven rack in the middle of the oven and preheat to 375 degrees Fahrenheit. Remove the dough from the refrigerator. Lightly dust your countertop, hands and a rolling pin with flour. Roll out the dough into about an 11” to 12” round. Place it in a pie mold, pressing the bottom and sides into the mold and crimp the edge on top.
  • Pour the filling into the pie crust. Cover the pie loosely with aluminum foil and place in the oven. Bake for 55 minutes, or until the pie is set and edges have lightly browned. Remove from the oven and let cool before serving.

Notes

Pay de Dulce de Leche y Chocolate con Nuez  

Flour Tortillas

Flour Tortillas
Print Recipe
4.59 from 12 votes

Flour Tortillas

Flour Tortillas from Pati’s Mexican Table Season 7, Episode 3 "Ensenada’s Epic Seafood"
Prep Time40 minutes
Cook Time2 minutes
Total Time42 minutes
Course: Side Dish
Cuisine: Mexican
Keyword: pati's mexican table, tortillas
Servings: 16 Tortillas
Author: Pati Jinich

Ingredients

  • 1 pound all-purpose flour or about 4 cups plus more to roll out tortillas
  • 1 teaspoon kosher or sea salt
  • 2/3 cup vegetable shortening or lard
  • 1 cup lukewarm water

Instructions

  • In a mixing bowl, combine the flour, salt and vegetable shortening with your hands, slowly incorporate the lukewarm water and mix until it can come together into a ball. Transfer to the counter and knead for about 2 to 4 minutes, until it is smooth like play dough.
  • Divide the dough into halves until you have 16 balls of dough. Place them on a floured sheet or board, cover with a clean kitchen towel and let them rest for 25 to 35 minutes.
  • Heat your comal or ungreased cast iron or non-stick skillet over low heat. On a lightly floured surface, roll out each ball with a floured rolling pin, rotating 5 or 6 times until you get a 7” round.
  • Place the tortilla on the already heated comal or skillet. You will hear a faint sizzle. After 40 to 50 seconds, when there are brown freckles on the bottom side and there are air bubbles puffed up all over the tortilla, flip over. Cook for 40 to 50 seconds more, until the other side is freckled and the tortilla puffs up even more, like pita bread.

Notes

Tortillas de Harina

Story Goes… Governor Shrimp Tacos

The story goes, governor shrimp tacos, or tacos gobernador de camarón, were created in the state of Sinaloa in the early 1990s to surprise governor Francisco Labastida Ochoa, after he told a few friends how much he loved his wife’s shrimp tacos. That bit of information was passed on to the owners of Los Arcos in Mazatlán restaurant, before he headed there to visit.

The chef was given the quest not only try to match the governor’s wife’s tacos, which no one besides the governor had tried, but to beat them. So quite a few taco recipes were developed and tested. When the governor showed up to eat, he liked them so much he named them “tacos gobernador.”

Now, I do not know if that story is entirely true. But, what I do know is, these tacos became so popular you no longer only find them at Los Arcos in Mazatlán. They are all over Sinaloa and beyond. I had them as far away as Los Angeles and Miami.  Yet, I saw the most renditions on the 800 mile drive throughout the entire Baja Peninsula.

I felt more than obliged to offer my take on tacos gobernador, since my travels in Baja are featured on “Pati’s Mexican Table” in my new season premiering in a few weeks (you can watch the trailer here). And I am thrilled to share my recipe with you, as we all love these tacos in my home!

So what’s in tacos gobernador? First, a combination of shrimp and cheese makes them a cross between a taco and a quesadilla. A ton of cheese is really essential.

Second, cooked onion that is often accompanied by other vegetables, typically bell peppers and sometimes poblano chiles. If you ask me what I prefer, hands down, not even a second of hesitation, poblano chiles. I absolutely adore them. I feel lukewarm about green bell peppers to put it mildly. So my take has a combination of slivered onions and poblanos with just a bit of tomato.

Third, the seasonings. Some renditions have no sauce, only salt and pepper. Some have a simple to a more seasoned tomato sauce. I go for a seasoned, very thick sauce that is almost a paste, really. It combines tomato paste, La Costeña chipotles in adobo and the W sauce — Worcestershire — or as we call it in Mexico “salsa inglesa.”

Lastly, you can opt for corn or flour tortillas. There are no strict guidelines here, different from other kinds of tacos.

There are so many reasons why I like these tacos so much. They end up being a complete meal, they are so easy to prepare, they are irresistibly delicious and messy, the cheese creates an inviting crust as it melts… and they have a great story behind them. I do love a good story.

Governor Shrimp Tacos
Print Recipe
4.50 from 6 votes

Governor Shrimp Tacos

Governor Shrimp Tacos recipe from Pati's Mexican Table Season 7, Episode 1 "Tijuana’s Culinary Revolution" 
Prep Time15 minutes
Cook Time20 minutes
Total Time35 minutes
Course: Appetizer, Main Course
Cuisine: Mexican
Keyword: Antojo, Mexican, pati’s mexican table, Shrimp, Sinaloa, Taco
Servings: 6 Tacos
Author: Pati Jinich

Ingredients

  • 4 tablespoons unsalted butter
  • 1 1/2 white onion slivered
  • 2 poblano chiles stemmed, seeded, slivered
  • 5 garlic cloves finely chopped
  • 2 ripe Roma tomatoes cored, seeded, slivered
  • 3 tablespoons sauce from chipotles in adobo
  • 2 tablespoons tomato paste
  • 2 teaspoons Worcestershire sauce
  • 1/2 teaspoon kosher or sea salt or to taste
  • 1/4 teaspoon freshly ground black pepper or to taste
  • 1 1/2 pounds (about 11-15) shelled large shrimp cut into large chunks
  • 3 cups shredded Oaxaca, mozzarella, asadero or Muenster cheese
  • 6 to 8 flour or corn tortillas
  • Sliced avocado for garnish
  • 1 Chile Manzano sliced and mixed with the juice of a lime, 1/4 red onion and salt to taste

Instructions

  • Heat the butter in a large nonstick skillet set over medium-high heat. Once it melts and begins to bubble, add the onion and poblano and cook until wilted, about 3 minutes. Add the garlic, stir, and cook until fragrant, about 1 minute. Incorporate the tomatoes, cook for a minute, and as they begin to soften, add the sauce from the chipotles in adobo, tomato paste, Worcestershire sauce, salt and pepper. Stir well, cook for another minute, then add the shrimp and cook just until they change color, about 1 to 2 minutes. Turn off heat and scrape into a bowl to prevent the shrimp from overcooking.
  • On a preheated comal set over low heat, heat the tortillas on both sides for a minute. Add about 1/2 cup of shredded cheese onto each one. Once the cheese begins to melt, add a generous amount of the shrimp mixture, fold in half and continue heating until cheese has completely melted and the tortillas have begun to lightly brown and create a crust.
  • Serve with sliced avocado and Manzano chiles and onion.

Video

Notes

Tacos Gobernador de Camarón

El Huequito

By Eduardo | @cazadordelomejor

There are so many places to eat tacos al pastor in Mexico City and each one is unique. El Huequito’s original location on Ayuntamiento, a busy street in Mexico City’s downtown, has been serving tacos al pastor for almost 60 years. You order off the street and eat on the other side of the sidewalk at an aluminum high-top table with a variety of spicy salsas and freshly cut limes.

el huequito mexico city

Pastor is crispy shavings of vertical spit-roasted pork marinated with dried chiles and spices. Very similar to shawarma or doner kebab, pastor was influenced by the strong Lebanese migration that occurred in Mexico in the early 1940’s.

In 1959, Guillermo Buendía and Amelia González started the business in a one-by-one-meter location. Due to the size, clients would refer to the taco shop as a “huequito,” meaning a very small space in Spanish.

The tacos al pastor at El Huequito are different than all the rest in Mexico City. No pineapple and no cilantro here. Just freshly shaved pastor meat wrapped in a tortilla with a little green salsa, chile de árbol salsa and onion, then straight back on the grill to seal in the flavor.

pastor at el huequito

If you visit one of El Huequito’s newer locations, like the one in Condesa neighborhood, you’ll experience a longer menu with classics such as the especial — a mountain of pastor topped with corn tortillas, onion and green salsa, so you can make your own tacos.

A couple tacos al pastor with an ice-cold agua de horchata is probably one of the best combinations that exists in Mexico City’s street food scene today.

El Huequito, Ayuntamiento 21, Colonia Centro, Centro, 06050 Ciudad de México

El Rey del Pavo

By Eduardo | @cazadordelomejor

In Mexico, and many parts of the world, roasted turkey is mainly served during the holiday season. Imagine a place where shaved slices of juicy roasted turkey are served on a soft telera smothered with avocado and spicy rajas. This place exists, it’s located in the heart of downtown Mexico City and, here, you can devour a turkey torta during any month of the year.

El Rey del Pavo has been in business for over a century. It was founded in 1910 by Ramón Avellana, a Spanish man from Gironella, a small town just North of Barcelona. Ramón moved to Mexico in 1906 and brought with him homey recipes, which are still used in the kitchen, and the idea of charcoal roasting the turkeys. The first location was at Palma Street #19. After moving locations twice, Ramón’s nephew, Carlos Moreno, is in charge of the restaurant’s new location, just a couple blocks down, at Palma Street #32 in Mexico City’s historic center.

slicing tortas at el rey de pavo

Walking in you’ll see an open kitchen and lined up are the torteros and taqueros making turkey tortas and tacos by the dozen. There are lots of options here ranging from turkey breast in adobo, thigh, and turkey chicharrón. The restaurant is simple, lots of wooden tables with blue leather chairs that make for a diner-like feel. Most of the people who go in for a bite have been visiting the place for years and bring different generations of the family to try it.

Each time I visit, I’ll start off with a taco and end with a torta, accompanied by a hot bowl of turkey broth to dip. It’s hard to leave this place without a takeout bag to enjoy for dinner.

taco at El Rey de Pavo

El Rey del Pavo, Calle de la Palma 32, Centro Histórico, Ciudad de México

Newsweek en Español: Pati Jinich y el éxito de la comida mexicana casera

“Pero el camino para conseguir su propio programa de televisión, Pati’s Mexican Table, fue muy largo. ‘¿Sabes cuántas veces me pidieron que me quitara el acento, que no hiciera comida mexicana, sino latinoamericana, que me cambiara el pelo? Yo soy orgullosamente mexicana, no voy a pretender. Para mí la autenticidad y honestidad son lo más importante’, cuenta Pati. Y al querer publicar su primer libro sobre comida mexicana, mandó 40 propuesta a diferentes editoriales y recibió 40 respuestas negativas, revela.” Continue reading “Newsweek en Español: Pati Jinich y el éxito de la comida mexicana casera”

Cotija Cheese

Cotija cheese is a salty, slightly acidic, cow’s milk cheese with a strong personality. Named after the city of Cotija in the state of Michoacán, it has been produced in the region for over 400 years. Traditionally, after the dairy cows grazed in the mountain pastures throughout Jalisco and Michoacán during the rainy season, the cheesemakers would bring down their cheese to be aged in Cotija for at least two months.

Cotija is a hard, dry, aged, and mature pressed cheese with a grainy texture that crumbles easily. It has a high salt content, so it isn’t really a cheese you want to take a big bite out of or have on a cheese platter. But it is perfect for adding a tangy and salty finish to a dish, be it savory or sweet. Grate some Cotija over tacos, enchiladas, corn, salads, and more to add lots of savory flavor.

Even though the real Cotija cheese has a collective brand recognition, Cotija producers haven’t been able to have it get the desired and prestigious denomination of origin. Although it is very prided locally, it is also known all over Mexico and increasingly abroad. Its availability in the US is pretty recent, maybe not even a decade.

You can usually find Cotija as a square or round block, cut into pieces, or already grated or crumbled at your local market, like in the photo above. You can think of Cotija as a Mexican version of parmesan.

Sopes

The very first class I taught at the Mexican Cultural Institute, after I switched from being a policy analyst at the Inter American Dialogue, was October 18, 2007.

I remember the date exactly, because it was a day after Sami’s 6th birthday. For months, I had been teaching him and his two brothers, Alan who was then 8 and Juju who was just 1, how to make sopes every night for at least 3 months.

I had been so nervous about teaching in front of a live audience that, instead of telling them our usual bed time story about an imaginary and mischievous monkey called Waba-Waba, I had switched to a nightly cooking demo. They were as loving and kind and patient as they are with me to this day, did not complain, and pretended to be making sopes along with me.

I started the classes at the Institute in an attempt to share my love for Mexican cuisine and culture and to try to open a much wider window into its richness, diversity and surprising accessibility. I wanted to help break misconceptions about our food and our people and invite people north of the border to make use of our ingredients, techniques and recipes to enrich their own kitchens.

The very first dish that I shared was sopes. I even found a photo of that day… and you can see Rosa and I showing how to make sopes many ways, with our hands, using a rolling pin, with a tortilla press…

Pati and Rosa making sopes at the Mexican Cultural Institute

Why did I choose sopes? To begin with, because they are one of my favorite things to eat! But also, because sopes helped me shine a light on so many crucial elements of Mexican cuisine…

Sopes are part of a category of dishes we Mexicans call antojos, or antojitos, which translates to little cravings. An antojo is something you can eat anytime of day and can either be a quick bite or make a full meal, depending on what you top them with… and how many you eat.

Sopes are made of corn masa, which is a cornerstone of Mexican cuisine that has existed for thousands of years. Made of nixtamalized corn, corn masa renders corn nutritious and versatile. You don’t need to nixtamalize corn yourself, you can buy masa harina, which simply mixed with water makes masa!

Sopes show how playful and versatile masa can be. They are similar to a tortilla, but they are much thicker, and the rim around it that helps contain its garnishes. They are like little edible plates.

Sopes are easy to make. Different from a corn tortilla, someone who is making sopes for the first time, doesn’t need to worry about knowing how to use a tortilla press, the correct thickness, or the technique for making them puff up. They are much more forgiving.

Sopes are also accessible: you can make them ahead of time, vary the toppings, assemble in a few minutes, dress them up or dress them down. I always, always, add a layer of refried beans, a tasty salsa and either tangy, salty and crumbly queso cotija or queso fresco, crumbled on top.

To boot, sopes are super fun to make by yourself or with friends or with your kids.

So as you can see, sopes helped me achieve many things: they helped me show how accessible, forgiving, fun, filling, nutritious, versatile, rich and delicious Mexican food is.

You can follow along with this video too…

To this day, I am still proudly teaching at the Institute where I am the resident chef 11 years after I started. I am also serving sopes any chance I get.

Pati Jinich sopes
Print Recipe
5 from 5 votes

Sopes

Sopes recipe from Pati's Mexican Table Season 6, Episode 10 "How I Got to Now"
Prep Time10 minutes
Cook Time8 minutes
Total Time18 minutes
Course: Appetizer, Main Course
Cuisine: Mexican
Keyword: cotija, queso fresco, refried beans, sopes, Tomatillo Salsita
Servings: 12 sopes
Author: Pati Jinich

Ingredients

To make the Sopes:

  • 2 cups masa harina or corn tortilla flour such as Maseca
  • 2 cups water more if needed
  • Pinch kosher or coarse sea salt

To serve:

Instructions

  • Heat a comal or skillet over medium heat until very hot.

To make the sopes:

  • Combine the masa harina, water and salt, kneading in a revolving motion with your hands. Knead for a couple of minutes, until dough is smooth and has no lumps. If it feels too dry, add a bit more water.
  • Divide the dough into 12 balls, each about 2-inches in diameter. Line the bottom of a tortilla press with circles cut from a thin plastic bag (like the ones from the produce section of your grocery store). One at a time, place a ball of dough onto the plastic lining the bottom of the tortilla press, and top with another layer of plastic. Press down to make a flat disk as thick as a pancake, about 1/4-inch thick (much thicker than a tortilla). You can also flatten and form them by hand. Repeat with all 12 balls.
  • As you make them, place each sope on the hot comal or skillet. Let them cook about one to two minutes on each side, until opaque and speckled, and they can be flipped without sticking.
  • Take them off the comal and place them on a chopping board. Using a kitchen towel to protect your fingers, make a rim around each sope by pressing and pinching with your fingers along the edges. Return them to the comal or skillet, and let them cook for one or two more minutes per side, until thoroughly cooked.
  • If eaten the same day, they may be kept wrapped in a clean kitchen towel. If not, wrap them in a kitchen towel or paper towel, and store inside a closed plastic bag in the refrigerator. They will keep for up to 3 days, afterwards they will turn too hard. Reheat on hot comal or skillet for a couple minutes before eating. They can also be frozen and kept for months.

To serve:

  • Once the sopes have been thoroughly cooked and warmed, place on a platter and add a generous tablespoon of refried beans, shredded lettuce, crumbled cheese, chopped onion and Quick Roasted Salsita. Salsa may be left on the side for people to add as much as they like.

Emmy Magazine: A Taste of Home

“I’ve learned much more about Mexico — my home country — and the people of Mexico while being in the U.S.” she says. “I’m also an American, and I value the culture and beauty this country has to offer. Sometimes it takes the eye of someone who might seem to be on the outside to really appreciate where you come from and where you are.” Continue reading “Emmy Magazine: A Taste of Home”

Animal Gourmet: Pati Jinich, la Mexicana que conquistó la TV en EU con la cocina de México

“Sin duda, Pati está convencida de que hay que trabajar más duro para construir más puentes entre ambos países y qué mejor que a través de la cocina.

‘¿Qué terreno más noble que la cocina, que una mesa? ¿Quién le va a decir que no a un plato de pozole, de carnitas? La cocina es una manera de romper mitos, muy noble, muy… que perdona’.” Continue reading “Animal Gourmet: Pati Jinich, la Mexicana que conquistó la TV en EU con la cocina de México”

Scallop Aguachile at the James Beard House

Mexican cuisine is riding such a high wave these days.

Compared to when I first moved to the US, 20 years ago, you can now find all the ingredients you need to prepare Mexican food. People are not only eating Mexican food out, but are bringing it into their home kitchens. There’s the #tacotuesday and the #taconight. Wherever you travel to in the US, there’s Mexican food to be found in airports, restaurants, hotels, fast food chains, and the offerings continue to increase and get better. It seems like the more people get to know Mexican cuisine, the more they want to taste it, to cook it, to explore its depth.

It is such a thrill to be part of this movement. I particularly enjoy traveling through the US to cook whenever I get an invitation. And I was beyond ecstatic when I got the request from the James Beard House in New York City to whip up their Cinco de Mayo dinner. What an honor! But of course, the pressure was on. What theme, which menu, what drinks? So much to share!

To be sure, Cinco de Mayo is not a big celebration in Mexico. It is a somber occasion honored in the state of Puebla, where the Cinco de Mayo Battle took place in 1862. It was a battle between a small Mexican militia against a big French army, and while the Mexicans won, with the odds stacked against them, the French won right back. Yet, move the clock forward a few years and Mexico regained its Independence.

Now, for whatever reason, which many have unsuccessfully tried to explain, Cinco has become the biggest Mexican-themed party abroad. I was bewildered at first when I started getting invites to Cinco de Mayo parties from our American friends. But then, of course, happily joined the excitement of the Cinco train. Listen, if there is an open door to celebrate anything and everything that we love and are proud of about Mexico, and share our food, cuisine and culture: count me in!

menu from the dinner at the James Beard House

Photo courtesy Clay Williams (@ultraclay)

As a Mexican immigrant, to be invited to the James Beard House, such a prestigious place and institution, made me feel proud and like my food is worth it. But, it also made me feel like Mexican food has really started to earn its rightful place in the eyes of the culinary world of the US.

You can see the menu above. Because I really couldn’t choose a Mexican region to focus on, I opted for what I called a Mexican culinary compass: different foods from different places from Mexico, a few childhood favorites, and a couple new dishes from my kitchen. Carnitas from Michoacán, caldo de camarón from Acapulco, gorditas from Oaxaca…

The first course of the formal sit-down dinner menu, after the cocktail hour, was a scallop aguachile inspired by the coastal region of the Sea of Cortez.

The team from the James Beard House is a joy to work with. We prepped the day before, as it was a long menu! Then my production team and I got so excited with the occasion that we decided to make it part of an episode of the next season of Pati’s Mexican Table, which will premiere in September 2018.

Pati Jinich plating her classic scallop aguachile at the James Beard House

Photo courtesy Clay Williams (@ultraclay)

But meanwhile, I leave you with the scallop aguachile recipe. It is SO GOOD. And it could not be simpler. It helps break so many myths about Mexican food. Not all Mexican food is fried, or laborious, or covered in cheese, or severely spiced up, or takes forever to prepare. In fact, most Mexican food is healthy, soulful, delicious, nutritious. It gives beautiful ingredients, like the plump, silky and sweet fresh sea scallops a chance to shine by just dressing them beautifully, lightly and kindly.

scallop aguachile

Photo courtesy Clay Williams (@ultraclay)

Mexican cuisine is indeed riding such a high wave today. And I can see the high tide ahead, with the wave getting even bigger and higher. So excited and honored to have the possibility to continue to ride it and bring the fruits of this journey to your shore.

Print Recipe
4.80 from 5 votes

Scallop Aguachile

The first course from Pati's Cinco de Mayo dinner at the James Beard House in New York was a scallop aguachile inspired by the Mexican coastal region of the Sea of Cortez.
Prep Time15 minutes
Resting Time15 minutes
Course: Appetizer
Cuisine: Mexican
Keyword: Aguachile, Ceviche, jalapeno, lime, Scallops
Servings: 4 servings
Author: Pati Jinich

Ingredients

  • 1 pound large fresh scallops
  • 1/4 cup lime juice freshly squeezed
  • 2 tablespoons extra virgin olive oil
  • 1/4 cup red onion slivered
  • 1 serrano or jalapeño chile thinly sliced
  • 1/2 teaspoon kosher or sea salt or more to taste

Instructions

  • In a bowl, combine the lime juice, olive oil, onion, serrano and salt. Whisk and let sit for at least 15 minutes, or cover and refrigerate up to 12 hours.
  • When ready to serve, remove lime juice mix from the refrigerator. Slice the fresh scallops thinly and horizontally, up to 1/8” width. Spread on a platter. Whisk the lime juice sauce and pour in its entirety over the scallops, arranging so that the onion and chile are spread evenly throughout. Serve immediately.

Notes

Aguachile de Callo de Hacha

Edible DC

“I was very enthusiastic, and word-of-mouth really helped to spread and share the love for my classes,” she says, “But I tell this to everyone who’s ever been enthusiastic about something: ‘Don’t get distracted by the noise. What’s defined my career is that I never took the fast road, and I have to feel really comfortable and proud of everything I do.” Continue reading “Edible DC”

Maracuyá or Passion Fruit

Maracuyá, also known as passion fruit in English, is one of the many exotic fruits of Mexico. It is grown in the tropical and semi-tropical regions of Mexico, like Oaxaca and the Yucatán Península. It is native to South America, originating in Brazil, and there are different varieties.

In Mexico, the yellow- or purple-skinned varieties are the most typical. Inside the hard and somewhat crusty looking exterior, that is easy to open by either breaking with your hands or slicing with a knife, there are crispy deep black seeds covered with a yellow coating. That yellow coating covers the seed and it attaches to the inside of the peel. The yellow coating goes from the very light yellow to the almost orange as it gets closer to the peel. You eat it all, except the peel. The seeds are crunchy, and the flesh is very soft, a bit slimy, and juicy. The taste is a tad bitter, very citrusy, teasingly sweet and overall delicious.

In Mexico, we love eating them just as they are, but it is also popular to make soda and agua fresca (especially in Oaxaca!). Passion fruit is used in dishes from savory to sweet. Alex Ruiz, a fabulous chef from Oaxaca who came to cook with me at the Mexican Cultural Institute here in DC, used it to make a jam-like concoction for a fresh ceviche. It was divine! It is also used in tons of desserts and drinks. From breakfast (over yogurt, with cereal), to lunch (jams, spreads, a sweet and sour addition), to smoothies and drinks all day long. And as you can guess… it is super nutritious! Full of vitamins and fiber and has a good dose of phosphorous, potassium and magnesium. It also has a high water content.

Increasingly, you can find passion fruit in regular grocery stores, aside from Latino or international markets. You want to look for the ones with a smooth skin and a deep yellow or purple color. Unripened fruit will have green spots, and older fruit will have a bit of wrinkled skin. To remove the seeds, all you need is a spoon. I am a fan of eating it all by itself.

Molino “El Pujol”

By Eduardo | @cazadordelomejor

From one day to the next, heirloom corn became a strong topic of conversation in Mexico. However, heirloom corn varieties have been a cornerstone of Mexican cuisine.

Chefs in Mexico City, Enrique Olvera included, have been using heirloom corn in their restaurants for years to make fresh tortillas, tamales, gorditas, or other antojitos that are made after the nixtamalized corn is turned into masa. Personalities like Olvera are aware of the importance of communicating the use of non-modified, non-GMO, pure, heirloom corn to Mexicans and the world.

molino el pujol

At the end of April, Molino “El Pujol” was born. A small tortilla shop in the Condesa neighborhood run by Enrique and his team, whose main restaurant Pujol is on San Pellegrino’s list of the 50 best restaurants in the world.

The team behind Molino has gotten very creative and built up a small menu that ranges from an avocado taco wrapped in an acuyo leaf, to the more complex corn cob smothered with chicatana ant, coffee and costeño chile mayo, to a cold glass of corn water to wash it all down. Molino is a sophisticated tortilleria, indeed.

molino el pujol

The place itself is simple, yet impressive. As you walk in, on the right, you’ll find a large corn mill and baskets of different heirloom corn varieties for sale. On the left, there is a small 6-seat counter with illustrations by Hilda Palafox, a well known Mexican artist and illustrator. At the end of the counter, you’ll see a refrigerator with fresh salsas and Mexican craft beer.

Molino “El Pujol” supports numerous families in different states of Mexico whose livelihood depends on producing heirloom corn varieties.

molino el pujol

Molino “El Pujol,” General Benjamín Hill 146, Hipódromo Condesa, Ciudad de México

Sardine Empanadas

What to do with a couple cans of sardines? Do what the people from landlocked Aguascalientes do: make the tastiest empanadas.

Over the past dozen years, I have been amazed by so many things, as I’ve ventured into a deep exploration of Mexico’s cuisine to share it with the world – or whoever will listen. Its richness, its diversity, its depth, its accessibility, its generosity… One thing that has also stood out, everywhere, is the resourcefulness of its people.

You know the saying, if all you have are lemons, make lemonade. That exponentially applies to the Mexican spirit.

Take the state of Nuevo Leon that is so rich in oranges. You will find everything from orange cake, orange cookies, orange drinks, orange chicken, orange candy, to amazing orange preserves.

Aguascalientes is a place deeply inland, with no water outside its borders and no water within its borders – no lakes, no rivers. Bien tierra adentro, as we say. Historically, the only fish and seafood that has been available there, for the most part, is that which can be preserved: salted, dried, pickled, or canned. Hence, these sardine empanadas, a dish that truly embellishes the sardines.

I was intrigued when I stumbled upon this recipe as a specialty of the region. It jumped out at me like a jack-in-the-box screaming: test me please! See, I inherited a deep taste for sardines. A funny ingredient to dig, I know. Pretty basic and not much glamour about them…

Oh, but it’s the lightly salty, oily, peculiar rich taste and kind of pasty consistency to them that I grew to appreciate from two men I love. My father, whose favorite torta – and he is a heck of a torta maker – has sardines, avocado, onion and pickled jalapeños. And my grandfather, my father’s father, who was an angel that happened to land on earth – ok, fine, he was a Polish man fleeing persecution, who found refuge in Mexico when he was merely a teen – loved eating sardines on saltine crackers smeared with butter.

Pati with her Grandpa
With my grandfather, like 25 years ago…

Turns out, you really only need basic ingredients to make these empanadas. And they end up gorgeous, inside and out.

Here is a bird’s eye view of the empanadas.

sardine empanadas

You know why they have such deep and shimmering golden brown color on the top? Because in Aguascalientes, they brush the empanadas with only the egg yolks. No worries, you won’t waste the egg whites. You can use them to help seal the inner seam of the empanada.

As far as the filling: Sardines are combined with mushrooms that are seasoned and browned over softened onions and mixed with mushy cooked tomatoes, olives and pickled jalapeños. The sardine flavor is nuanced by the combination, yet not hidden. It is embellished in a way.

The mushrooms are a non-competing companion that makes the filling more substantial and adds a nice soft bite. The puff pastry becomes the perfect wrapping to envelop the savory, lightly spicy, teasingly rich mixture.

Ok, here is an inside photo, so you can see the chunky and moist filling too.

sardine empanadas

You can make them for lunch or dinner and eat them with a green salad on the side. You can also make them mini and have them as appetizers. You can eat them hot, right out of the oven. Or you can eat them at room temperature. And you know I am going to say this: they are actually also delicious cold.

The best thing is, if you have leftovers, everyone will have a delicious to-go lunch for school or work.

Sardine Empanadas
Print Recipe
4.34 from 12 votes

Sardine Empanadas

Sardine Empanadas from Pati's Mexican Table, Season 7, Episode 7 "La Paz: The Heart of Baja Sur"
Prep Time30 minutes
Cook Time30 minutes
Total Time1 hour
Course: Snack
Cuisine: Mexican
Keyword: Empanadas, fish, pati’s mexican table, sardines
Servings: 20 Empanadas
Author: Pati Jinich

Ingredients

  • 1 pound frozen puff pastry
  • 2 tablespoons vegetable oil
  • 1/2 cup white onion chopped
  • 2 cups white button mushrooms cleaned and diced 8 ounces
  • 1/2 teaspoon kosher or sea salt
  • 1/4 teaspoon ground black pepper
  • 1 cup ripe Roma tomatoes chopped about 1/2 pound
  • 1/2 cup manzanilla olives stuffed with pimientos chopped
  • 1/4 cup pickled jalapeños chopped
  • 2 cans (3-4 ounces) of sardines in oil broken into chunks
  • 2 eggs separated
  • All-purpose flour for rolling out puff pastry

Instructions

  • Remove the puff pastry from the freezer and let it thaw on your countertop.
  • Heat the oil in a medium casserole or a sauté pan set over medium heat. Once hot, cook the onion for 3 to 4 minutes until it softens. Incorporate the mushrooms, sprinkle in the salt and pepper, and cook for another 5 to 6 minutes, until the juices come out and they begin to dry out, and the mushrooms start browning a bit. Add the tomatoes and cook for 6 to 7 minutes, until they start breaking down and becoming mushy and soft. Add the olives and jalapeños, mix well, and cook for another minute.
  • Remove from the heat, add the sardines, combine well and set aside.
  • Separate the egg whites from the egg yolks in two small bowls. Use a fork or a whisk to beat them separately.
  • Place the racks in the lower and upper thirds of the oven. Preheat the oven to 400 degrees Fahrenheit. Line a couple of baking sheets with parchment paper.
  • Lightly sprinkle flour on the countertop and rub some on the rolling pin. Roll out the puff pastry to thinner than 1/4-inch and use a 4-to-5-inch round mold to cut circles. Add a generous tablespoon of the sardine filling in the middle of each round. Brush a bit of the beaten egg white around the edges each round. Fold each one into a half moon shape and press the sides.
  • Using a fork, press the side of the empanada to help seal and decorate it. Brush the egg yolk on top of the empanadas and place them on the prepared baking sheets. Place the empanadas in the oven. Bake anywhere from 20 to 22 minutes, until the tops of the empanadas have puffed and are a shiny golden brown.

Notes

Empanadas de Sardina 

Twice Spiced Deviled Eggs

I don’t know if I have shared this with you before, but I am obsessed with eggs. I just love them. In fact, many of my favorite childhood memories have eggs in them.

Like sitting next to my mom before she left for work, so many mornings, as she ate her usual scrambled eggs with ham, always cooked until tender, along with a piece of black toast with a thin spread of honey.

Like when my dad taught me how to crack a soft boiled egg, using a coffee spoon in such a way as to impeccably remove the top, revealing the still runny yolk that seemed to be waiting for soft butter and a sprinkle of salt to be mixed in. Then, he rushed to dip a piece of toast in the hot yolk and gave me the first bite.

Like the very first time my mom obliged my plea to let me cook and commissioned me to make the Sunday brunch scrambled eggs. She gave me the eggs. The bowl. The pan. The butter. The salt that she took from the spice cupboard and left it open. Temptation was too hard to resist, and I added more than a dash of every bottle in it. Bright red paprika, beautiful star anise, deep yellow cumin, fragrant crumbled cinnamon, and on and on… You know how those eggs turned out. Since then, I have tried to tame my enthusiasm when cooking.

I find eggs to be one of the most fascinating ingredients. They are affordable. They are beautiful. They are accessible. They are versatile, too, and can be eaten for any meal of the day, any time of day, taken for a sweet or savory spin, taking center stage or as a crucial ingredient. To boot, they are, along with milk and seeds, amongst the most nutritious foods on earth. Oh, and if that wasn’t enough, they can be used for so many purposes aside from being eaten as eggs: they can act as a binding ingredient (think meatballs), as a thickener (such as in chocolate mousse), as a volume booster (like in a soufflé!) or as the medium that makes other ingredients shine (like in a frittata or omelet).

It is no surprise then that I have a hard time starting my day without eggs. My most common quick breakfast is, like my mom, scrambled eggs with ham. Followed by Huevos a la Mexicana, sometimes straight and sometimes adding crunchy green beans, slightly sweet diced zucchini or thinly sliced woody mushrooms. I can’t resist huevos ahogados or drunken in one or another salsa, like salsa verde, martajada or in a chunky tomato and poblano rajas salsa. Enchiladas stuffed with one or another kind of scrambled eggs for a sumptuous brunch are king for when you have guests. Any form eggs can take for a morning concoction, such as breakfast crepes, tortas, sandwiches or tacos, I will eat them up.

OK: getting to the point of this post. I love eggs so very much that the fact that there is something such as deviled eggs makes me beyond ecstatic. One of the best ways to honor the egg that can be eaten post breakfast and is so pretty, tasty and a classic finger food.

If there are deviled eggs on a menu, you know I am ordering some. If there is a tray being passed around at a cocktail hour or party, you know who that crazy woman is trailing the deviled egg tray.

Here is my version: I called them Twice Spiced, as they benefit from two of my favorite spicy Mexican condiments: Chipotles in adobo sauce and pickled jalapeños. You know you have nowhere else to go than to the kitchen to whip some up.

Print Recipe
3.58 from 7 votes

Twice Spiced Deviled Eggs

My version of deviled eggs: I called them Twice Spiced, as they benefit from two of my favorite spicy Mexican condiments - Chipotles in adobo sauce and pickled jalapeños.
Prep Time15 minutes
Cook Time10 minutes
Course: Appetizer, Hors d'oeuvre, Snack
Cuisine: American, Mexican
Keyword: bacon, Chipotle, Deviled, Eggs, jalapeno
Servings: 16 halves
Author: Pati Jinich

Ingredients

  • 8 eggs
  • 2 tablespoons mayonnaise
  • 2 tablespoons Mexican crema
  • 1/2 teaspoon dijon mustard
  • 2 teaspoons sauce from chipotles in adobo sauce
  • 2 teaspoons pickling vinegar from pickled jalapeños
  • 2 teaspoons white vinegar
  • 1 tablespoon unsalted butter
  • 1 scallion white and light green parts sliced
  • 1/2 teaspoon sugar
  • 3 bacon slices cooked until crisp and finely minced
  • Pickled jalapeños sliced or diced, for garnish

Instructions

  • Place the eggs in a saucepan and cover them with water by a couple inches. Bring to a boil over medium high heat. Let the water boil for a minute, turn off the heat, cover and let the eggs steep for 9 to 10 minutes. Remove the eggs from the water and let cool. Once they are cool enough to handle, peel and place on a chopping board. Using a sharp knife, slice each egg in half vertically.
  • With a spoon, remove the yolks and place them in a food processor. Along with the yolks, add the mayonnaise, crema, mustard, chipotles in adobo sauce, pickling vinegar from pickled jalapeños, white vinegar, unsalted butter, scallion and sugar. Process until completely smooth and fluffy. Give it a full minute of your time.
  • Place the egg yolk mixture in a pastry tube or use a plastic or piping bag. I like to use the star tip, but you can use a tip with whichever shape you like - you can also use a teaspoon. Add some of the minced bacon at the bottom of each white half. Pipe or spoon the egg yolk mixture on top. Garnish with the jalapeños and serve.

Notes

Huevos Rellenos Doblemente Sazonados

Red Sauce

chile rellenos pati jinich
Print Recipe
3.75 from 8 votes

Red Sauce

Red Sauce for Chiles Rellenos recipe from Pati's Mexican Table, Episode 11 "Family Favorites"
Prep Time5 minutes
Cook Time25 minutes
Cuisine: Mexican
Keyword: chiles rellenos, red sauce, sauce, Tomato
Servings: 4 cups approx.
Author: Pati Jinich

Ingredients

  • 2 pounds ripe tomatoes
  • 2 garlic cloves
  • 1 1-inch thick slice of a large white onion outer skin peeled off (about 2 ounces)
  • 3/4 teaspoon kosher or coarse sea salt or to taste
  • 1/4 teaspoon freshly ground black pepper
  • 2 tablespoons vegetable oil
  • 1 cup chicken or vegetable broth

Instructions

  • Place the tomatoes and garlic in a medium saucepan, cover with water and bring to a boil over medium-high heat. Reduce heat to medium and simmer for 10 to 15 minutes until the tomatoes are completely smooth, cooked and mushy.
  • Place tomatoes and garlic in a blender along with the onion, salt, and black pepper and process until completely smooth.
  • Heat the oil in medium saucepan, set over medium heat. Once the oil is hot, pour in the tomato sauce, cover with a lid partially and simmer for 5 to 6 minutes, stirring here and there. Add the chicken broth, stir and cook for another 6 to 8 minutes, until well seasoned and lightly thickened.

Notes

Salsa Roja

Baked Plantains for Dessert

fried plantains
Print Recipe
5 from 3 votes

Baked Plantains for Dessert

Plantains, called macho bananas, plátano macho, in many areas of Mexico, can just change gears and move from one course to another. They make an original dessert or an anytime sweet treat. Just drizzle some sweet condensed milk, honey, sugar, Rompope, or ice cream on top! 
Cook Time25 minutes
Course: Dessert, Snack
Cuisine: Latin American, Mexican
Keyword: Baked, Dessert, Plantains, Sweet, Sweetened Condensed Milk
Servings: 2 to 4 servings
Author: Pati Jinich

Ingredients

  • 2 ripe plantains
  • Sweetened condensed milk to your liking or honey, sugar, ice cream or rompope

Instructions

  • Preheat oven to 400°F. Individually wrap the plantains, with their skin on, in aluminum foil and place in a baking sheet in the oven (some people bake them without the aluminum foil, you can try it both ways).
  • Bake for about 25 minutes, until plantains are completely cooked through, very soft and sugar has begun to caramelize. Carefully open up the foil making a slit down the middle, open it up, and pour the condensed milk on top.

Notes

Platano Macho al Horno

Ensalada de Navidad

My first formal job, after switching careers from political analysis to cooking, was as chef and cooking instructor of the Mexican Cultural Institute in Washington DC.

This was 2007. A year before, I had created a curriculum that aimed to open, one class at a time, a window into Mexican cuisine, history and culture for anybody living north of the border. What I didn’t know, when I began preparing it, was that classes were to be for a crowd of 100 people, on a stage, wearing a microphone, and having a big screen at my side. I thought it would be small cozy classes for 8 to 10 people in the kitchen. As much as I had culinary training and had done extensive research on Mexican culture and cuisine, I did not have any speaker or media training.

I was a bit frozen when I got up on that stage the first couple times. So much so that, for months, before putting the boys to bed each night, instead of telling them bedtime stories, I practiced teaching the classes with them. You bet they know how the recipe for chicken tinga goes!

One of the first demo/dinners we did was themed December Holidays in Mexico City. One of the dishes was this absolutely gorgeous Christmas Salad. Oh how I have loved, since then, sharing all the things about my native country with my new home country. But if you see this clip, taken from the “How I Got to Now” episode of my new season of Pati’s Mexican Table (now available on Amazon, as well as your PBS stations), you can hear my voice tremble a bit…

This salad is emblematic of Mexican cuisine. It has unexpected ingredients, unexpected tastes, unexpected textures. It is nutritious and healthy. It is not overly laborious. It is rich. It is fresh. It is generous. It is colorful! It is deeeeeelicious! As I said that day and still say today… in Mexico we have no taco salads. But, oh boy, do we have some amazing ones! Take a peek at the incredible ingredients and combinations that have come from Mexico’s kitchens and are now at your fingertips to enrich your daily life.

This year was the 10th anniversary of my live cooking demos and dinners at the Mexican Cultural Institute. It is my 10th year there as its resident chef. It is my 10th year working with the same amazing cooking team and the fabulous staff and the Institute’s leadership. And we have attendees who have not missed a single event in these 10 years! I couldn’t be more honored and proud. I hope to be able to continue this journey along with all of you as the years pass.

I end this post, the last one of 2017, with lots of love and gratitude for letting me into your home, via this blog, my recipes or because you tune in to my show.

Siempre,

Pati

Pati Jinich ensalada de navidad
Print Recipe
4.67 from 3 votes

Jicama, Beet, Orange, and Caramelized Peanut Christmas Salad

This salad is emblematic of Mexican cuisine. It has unexpected ingredients, unexpected tastes, unexpected textures. It is nutritious and healthy. It is not overly laborious. It is rich. It is fresh. It is generous. It is colorful! It is deeeeeelicious!
Prep Time15 minutes
Cook Time30 minutes
Course: Appetizer, Side Dish
Cuisine: Mexican
Keyword: beets, Christmas, Ensalada, Jicama, Mexican, Mexico, Navidad, oranges, Peanuts, salad
Servings: 6 servings
Author: Pati Jinich

Ingredients

  • 3 tablespoons red wine vinegar
  • 1 teaspoon honey
  • 1 teaspoon kosher or coarse sea salt or to taste
  • 1/2 teaspoon freshly ground black pepper or to taste
  • 1/4 cup extra virgin olive oil
  • 2 tablespoons vegetable oil
  • 1 medium jicama (about 1 1/4 pounds), peeled and cut into 1/2-inch-thick sticks
  • 3 pounds beets cooked, peeled, and quartered (*see note)
  • 3 oranges peeled and cut into 1/2-inch-thick slices
  • 1 cup caramelized peanuts coarsely chopped

Instructions

  • Combine the vinegar, honey, salt, and pepper in a small bowl. Slowly add the oils in a thin, steady stream, mixing with a whisk or a fork until emulsified.
  • Place the jicama, beets, and oranges in separate bowls and toss each with about one third of the vinaigrette. Arrange the ingredients in a pattern on a large platter. I like to do parallel stripes, and I often start with beets in the center, placing jicama on one side and oranges on the other. Sprinkle on the caramelized peanuts and drizzle any remaining vinaigrette on top.
  • * Note: To cook beets, cut off the greens and most of the stems, leaving about 1 inch. Don’t scrub them or cut off the thin root, or they will bleed their juices, sweetness, and color as they cook. Place them in a pot, cover with cold water, and bring to a boil, then lower the heat, cover, and cook until tender. Medium beets (about 2 inches in diameter) cook in 30 to 35 minutes. For this salad, you want them crunchy, so don’t overcook. Drain, let cool completely, then peel and cut.

Notes

Ensalada de Navidad

Itanoní Tortillería y Antojería

By Eduardo | @cazadordelomejor

Oaxaca is one of Mexico’s most interesting states, rich with culture, ingredients and tradition, and is home to a small and simple eatery that a big part of the country’s foodies talk about.

Itanoní is basically made up of plastic chairs, tables, colorful decorations hanging from the ceiling, clay comales and señoras who have a lot of experience cooking on them. Here you’ll find anyone from local kids enjoying an afternoon snack to business executives stopping in for lunch.

itanoni tortilleria y antojeria senora

The main ingredient here is heirloom corn in many different varieties. Once the corn has gone through the nixtamal process and has been transformed into masa, lots of different dishes are made. The menu ranges from tetelas, which are triangular corn masa pockets that can be filled with various ingredients, such as fresh cheese and squash blossoms, to the traditional fried egg over a warm tortilla finished with a fresh acuyo leaf and a little red or green salsa.

itanoni tortilleria y antojeria tetelas

A century ago, there was a lot more heirloom corn on the Mexican market than there is today. A lot of different varieties of heirloom corn got contaminated with genetically modified corns. Itanoní has managed to maintain using a rainbow of heirloom varieties and is one of the few restaurants in Mexico that do so.

Itanoní Tortillería y Antojería, Av Belisario Domínguez 513, Reforma, Oaxaca

Sweet Potato and Black Bean Tamales

Just when you think you completely understand something, life proves you wrong. Does that happen to you? It happens to me all the time, especially when it comes to food.

A cuisine as rich and diverse as Mexico’s needs for us to make an effort to preserve what has been passed on. But, you also have to keep an open mind to new ideas that may in turn become classics.

In that sense, I find the kitchen to be one of the most humbling places because food is always growing and evolving and taking you along, if you let it. You get to constantly learn, apply what you learn, share it, and then start all over again.

Take tamales for example. I have made countless kinds from all regions of Mexico and from different historical times. I have wrapped them in dried and fresh corn husks, banana leaves, hoja santa leaves…practically any and every edible leaf I know of in Mexico. I have learned to make them with raw masa, with masa colada, with rice flour masa, with normal wheat flour masa and even with no masa! I have done savory and sweet, with fillings that range from picadillo to marzipan and beyond. You name it, I have probably tried it.

I thought I had the tamales from the city of Oaxaca nailed down. Then, a few months ago, as we were filming Season 6 of Pati’s Mexican Table there, I was amazed to try a new tamal at Criollo, Chef Luis Arellano’s new restaurant. Its masa was made with pumpkin and filled with sweet refried beans laced with piloncillo. The only way to describe it is brilliant!

Back in my kitchen, I was inspired by the possibility of not only flavoring the masa, but enriching it with a starchy vegetable to lend taste, consistency and color. I came up with this sweet potato tamal filled with savory refried beans.

When the time came to test and play around with it, I was reminded of how important it is to appreciate the lessons that have stood the test of time. In the case of tamales: to review our technique for steaming, for assembling, for achieving a good masa. So we can still call our new creation something worthy of the name TAMAL.

Given the addition of the starchy sweet potatoes, I ended up having to test the idea quite a few times to achieve a very fluffy, yet tasty masa.

In the end, I am very happy with this one! The masa is puffy and moist, and its barely sweet flavor contrasts nicely with the savory, earthy taste of the refried beans. I also took the liberty of drizzling them with crema and topping with salty queso fresco.

Pati Jinich sweet potato black bean tamales
Print Recipe
4 from 5 votes

Sweet Potato and Black Bean Tamales

I thought I had the tamales from the city of Oaxaca nailed down. Then, a few months ago, as we were filming Season 6 of Pati’s Mexican Table there, I was amazed to try a new tamal at Criollo, Chef Luis Arellano’s new restaurant. Its masa was made with pumpkin and filled with sweet refried beans laced with piloncillo. The only way to describe it is brilliant! Back in my kitchen, I was inspired by the possibility of not only flavoring the masa, but enriching it with a starchy vegetable to lend taste, consistency and color. I came up with this sweet potato tamal filled with savory refried beans.
Prep Time1 hour 30 minutes
Cook Time55 minutes
Total Time2 hours 25 minutes
Course: Main Course
Cuisine: Mexican
Keyword: black beans, pati's mexican table, queso fresco, sweet potato, Tamales
Servings: 12 tamales
Author: Pati Jinich

Ingredients

  • 2 pounds sweet potatoes
  • 1 cup lard or vegetable shortening
  • 1/2 teaspoon kosher or coarse sea salt
  • 1 teaspoon baking powder
  • 1 tablespoon brown sugar
  • 1 2/3 cups corn masa flour or masa harina (such as Maseca)
  • 1/2 cup chicken or vegetable broth
  • 24 dried corn husks
  • 2 cups refried beans
  • 1 cup Mexican crema
  • 1 cup queso fresco crumbled

Instructions

  • Preheat oven to 450 degrees Fahrenheit.
  • Wrap the sweet potatoes in aluminum foil. Bake for 45 to 50 minutes or until completely cooked and soft. Remove from the oven. When cool enough to handle, cut open and scoop out the cooked pulp into a bowl. Set aside to cool.

To make the tamal masa:

  • Place the lard or vegetable shortening and 1/2 teaspoon of salt into a mixer, and beat over medium speed until very light, about 1 minute. Reduce speed to low, add baking powder and sugar, and take turns adding the corn masa flour and the broth. Raise speed back to medium and continue beating another 6 to 7 minutes, until the dough is homogeneous. In batches, add the cooled sweet potato pulp and continue beating for another 5 to 6 minutes, until the masa looks fluffed up.

To assemble the tamales:

  • Soak the dried corn husks in hot water for a couple minutes, or until they are pliable, and drain. Lay out a corn husk with the tapering end towards you. Spread about 1/3 cup masa into about a 2” to 3” square, the layer should be about 1/4” thick, leaving a border of at least 1/2” on the sides. Place about 2 teaspoons of refried beans in the middle of the masa square.
  • Pick up the two long sides of the corn husk and bring them together (you will see how the masa starts to swaddle the filling) and fold them to one side, rolling them in same direction around tamal. Fold up the empty section of the husk with the tapering end, from the bottom up. This will form a closed bottom and the top will be left open. Gently squeeze from the bottom to the top to even the filling out without pressing to hard. As you assemble all the tamales, place them as upright as you can in a container.

To prepare the tamalera or steamer:

  • Place water in the bottom pan of a steamer, so that water is under the steamer basket or rack, and bring it to a simmer. Line the steamer with one or two layers of soaked corn husks.

To cook the tamales:

  • When you have all tamales ready, place them as vertically as you can, into the prepared steamer with the open end on top. If there is space left in the steamer, tuck in some corn husks, so the tamales won’t dance around. Cover with more corn husks, and steam covered with a lid for 55 minutes to an hour. You know the tamales are ready when they come easily free from the husks. They will still be moist, and as they are released from the husks – you will see the moisture, like when you remove good moist muffins from their paper baking cups.
  • Finished tamales will stay warm for about 2 hours in the steamer. They can be made ahead several days before and stored in refrigerator, well wrapped. They can also be frozen for months. In either case, reheat in a steamer. For refrigerated tamales, it will take about 20 minutes and about 45 minutes for frozen tamales.
  • You can serve with a spoonful of Mexican crema and crumbled queso fresco on top.

Notes

Tamales de Camote con Frijol